Introduction
Welcome to my article series on setting up and understanding an efficient workflow for generating videos from still images using Wan 2.2. In this article, I go over a basic (non-efficient) workflow and generate a video, for which I will provide the image and parameters. I go over the concepts here in detail as well if you actually want to know what your workflow does and want to modify yours or make your own. Hopefully if you're new and you've had trouble using the workflows embedded on my videos, or even other pre-made workflows, this might help you get to a basic functioning workflow that you can build off of. If you don't want to generate a tutorial video to save money, I get it, but following along may still help you.
Assumptions: You have ComfyUI installed already. Preferably the portable version. You also have ComfyUI Manager installed, which is an extension that helps you download and manage custom nodes. You will need custom nodes, as ComfyUI is built to be modular.
A note about accelerators: I often refer to "acceleration" or "accelerators" in this article. These are effectively LoRAs that allow you to generate videos with a ton of motion in just a few steps. We will use these later on. For now, consider this article a teaching exercise on how Wan generation works.
Choosing an Image
The choice of initial frame for your video is obviously very important, but there are less obvious points to keep in mind when preparing the image. I won't go over image generation in detail because it's been thoroughly documented already and it would massively bloat the scope of these articles.
Play to the strengths of your LoRAs. If the LoRA author says it doesn't do well with certain appendages already in or not in the frame, then provide an image accordingly, or use a different LoRA.
To that end, you should always read the full description of every resource you use. It will save you a lot of future headaches. Even I may not mention or forget to mention information that may not be relevant to me, but is relevant to you.
The less errors (like six fingers, or smudged features) the better. It helps to think of Wan's video generation as a "budget." It can only create so much motion and changes with so many steps allotted. Correcting or accounting for errors in your frame will cost some of Wan's budget, and it will automatically try to do that. Errors may also cause Wan to misinterpret your image and give you an unexpected result.
A higher resolution image is helpful. Not because we need the resolution; the image will be downsized to 720p anyway. But because SDXL checkpoints, especially the more recent versions, tend to produce less errors at higher resolution. So you're more likely to get an image without errors if you start at a high resolution, or use "hi-res fix" (also known as latent upscaling) to enhance a low res image.
Also, inpainting will be your friend here. I won't go into that in detail for the reason described above, but I will say that it is very easy to inpaint in ComfyUI if you have an image generation model ready. Once you set up the (very simple) workflow, It is as simple as using the embedded editor to paint over the errors in your image with a brush, just like in Paint, and re-generating.
The Most Basic Workflow Possible
We're going to generate a video without any additional resources, including accelerators, just to prove that we can make this work. Fortunately, the ComfyUI development team is actually quite good at providing up-to-date templates and have provided a Wan 2.2 I2V template. You can see these through the menu bar on the top at Workflow > Browse Templates. Then select Wan 2.2 14B Image to Video.

If you're curious, 5B is a smaller model that only uses 5 billion parameters instead of 14 billion. It's just not very well supported. You won't find LoRAs or other resources for 5B very easily compared to 14B.
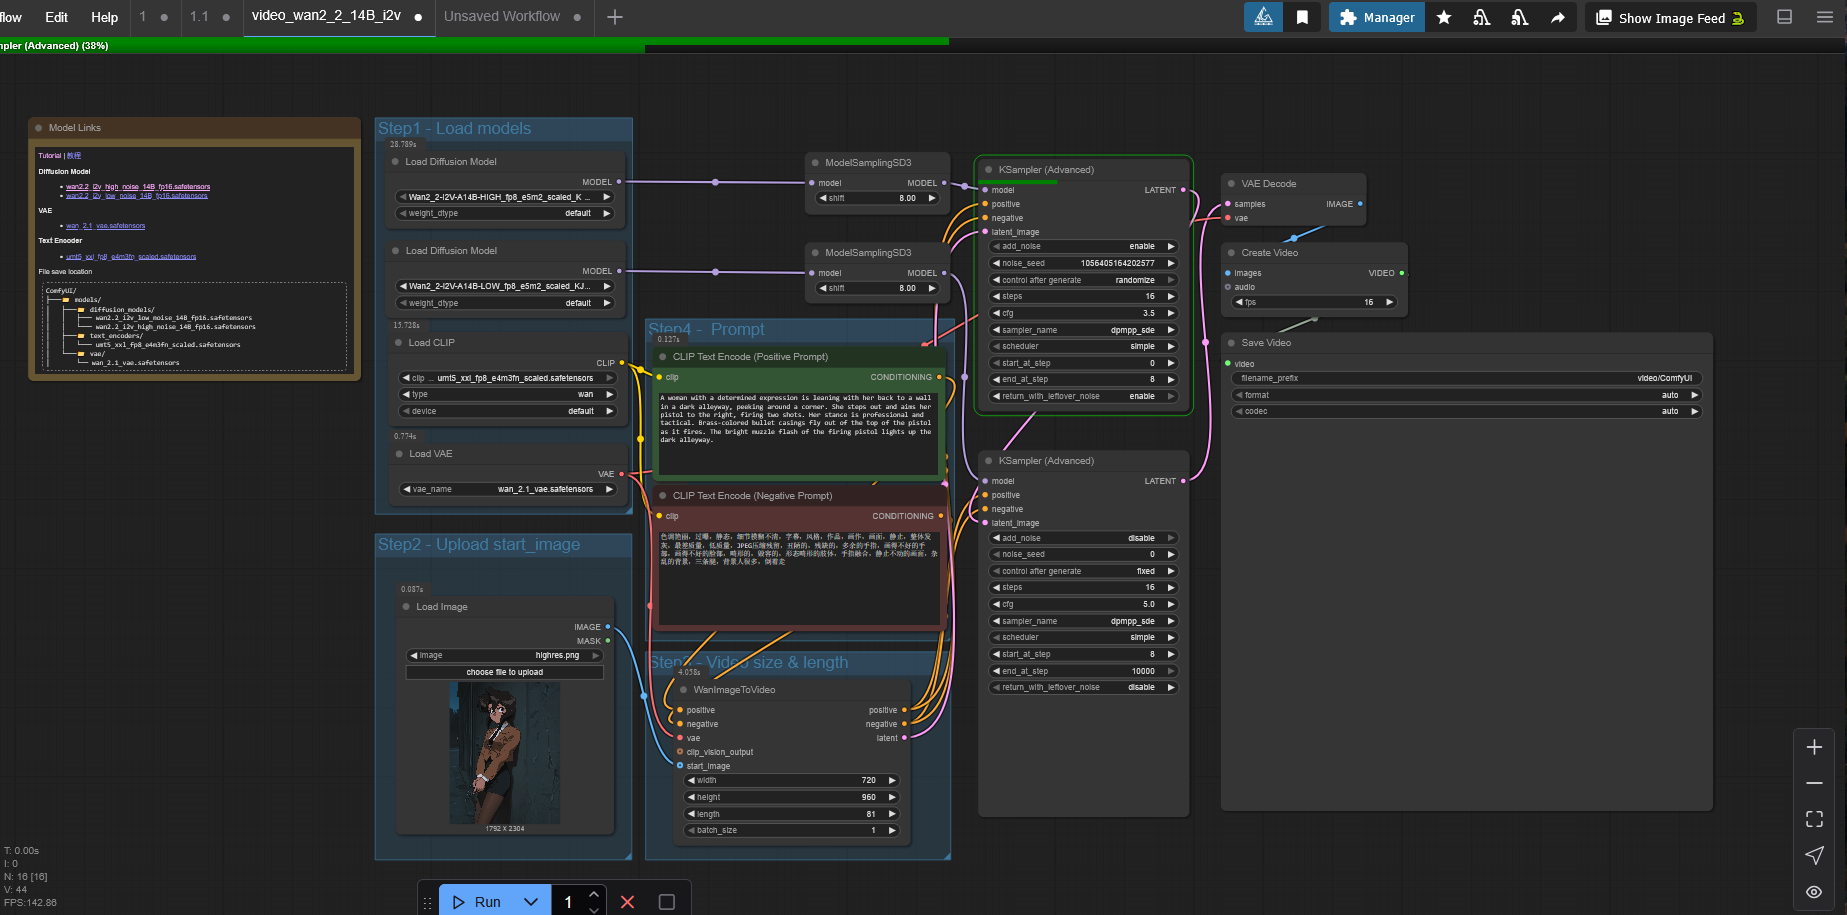
So, we end up with something like this (I've already changed the prompt and starting image).
If you don't have the required model files, the template author has provided links to download them here. However, most would suggest that you use a quantized version of Wan 2.2 rather than a native model, because it works better on lower VRAM hardware. You can find the links to the quantized versions of the model in this article below. These come in "GGUF" files instead of safetensors, and require a slightly different loader node as well as a different install location.
Node Details
Here, I'll explain the nodes and the values you can change on them in detail and some of the basic concepts of generative AI like CFG. If you want you can skip around and come back to this later, but I'd advise you try to understand these concepts eventually if you truly want to make good content.
The "Load Models" group
Each of the colored squares is called groups and they're used to organize the grey boxes, called nodes. Nodes "do stuff," in every sense. They're the most important part of ComfyUI and they are the building blocks for workflows. The "Load Models" group at the top left is pretty self explanatory. It loads Wan, the CLIP model which is used to interpret your text prompt, and the VAE, which is what transforms pixels to latent data and back again. Latent data is what an AI works with when it's generating an image or video. All of these models are loaded into memory.
Wan is split into two models, unlike most other generative AI models. It uses a "mixture of experts" architecture. To keep it brief, the high noise model generates the major features, like what the subjects of the video look like, and how the video looks after dramatic changes through either subject or camera movement. The low noise model generates smooth movement, general details, and what occurs between the parts the high noise model has filled in.
The only important node field here is weight_dtype. You will have to change this if your Wan 2.2 model is scaled. However, we will be using a GGUF model in this particular article, so this node won't be relevant in just a few paragraphs.
The "Upload start_image" group
This is where the image you want to start your video with is chosen. It uses a normal Windows file dialog to choose the file, pretty simple stuff.
The "Video size & length" group
This is where you choose your resolution and length. The length is in number of frames, not seconds. Your FPS is determined by the Create Video node at the end of the workflow, so you divide the length in this WanImageToVideo node by the FPS to get the length in seconds. It is also offset by 1, so instead of 80 for a five-second video, you are forced to choose 81.
Your resolution must be in the same aspect ratio as your starting image unless you want your video to look like crap. I have a cheat sheet that I use on my personal workflow for this:
square - 480x480 / 720x720
3:4 (896x1152) -> 480x640 / 720x960
2:3 (1024x1536) -> 480x720 / 720x1080
I put input image sizes I often use in parenthesis just to remind myself. You can swap these dimensions if you want a landscape video. You can generate at just about any resolution, just as long as it maintains aspect ratio with whatever image you started with, but you will have to do the math to scale the dimensions to 480p or 720p. If you don't scale properly, then your resolution might be too high and you might experience the heat death of the universe before your video generates.
For our first video, you will want to choose 480p, especially because we are not using an accelerator or SageAttention. This will prevent the video from taking eons to generate, but you can regenerate it later in 720p if you like it. Just keep in mind that, just like image generation, generating at a higher resolution will give you a different (usually better) result.
The "Prompt" group
It's a text prompt. You'll be familiar with this if you've used text to image or video generation before. However, with I2V prompts, you typically do not need to spend paragraphs describing the physical characteristics of the people, creatures and objects already visible in the image. Wan can read the image and already knows what you're referring to. You should stick to describing what happens in the video. Who moves where and how they move, etc. You should also describe any camera changes or cinematography that is used in the video.
ModelSamplingSD3
The rest of the ungrouped nodes are where the magic happens. These two nodes control a value only found in video generation workflows called "shift." To be blunt, I don't really know what it does, but you can generally vary these values between 5 and 8 to get different results for your video. Generally I start with both values at 8. If you want variations of a video using the same prompt, this is one of the nodes you can toy with.
KSampler
This is the sampler; it's the backbone of the whole workflow. And of any generative AI workflow, actually. Since Wan has two models, there are two samplers. There are several variables to go over here.

add_noise: This injects noise into the image and can be left at the default values. We want this enabled for the high noise model because it receives the latent data first, but we don't want our progress to be wiped out by more noise added by the low noise model, so it's disabled there.
noise_seed and control after generate: Every random number generator needs a seed number. "control after generate" determines what ComfyUI does when the sampler generates a video. Randomize will give you a random number, and increment and decrement will increase or decrease the last value by 1. I personally like to use increment so it's easy for me to go back to a prior seed without opening the workflow of that previous video. The seed value is completely arbitrary and only serves to help you generate a similar result as another video. You don't need a new seed for the low noise sampler, so it stays fixed at 0.
steps: A step is a cycle of generation. First, the sampler adds noise to whatever it is trying to generate. In other words, it creates 5 seconds of noise video, in this case. Literally static and blobs of color. Then it goes over that noise in this number of steps, refining it until we get something that looks good. More steps does not necessarily equal a higher quality video. It does to a point, but more steps really means more motion, so after a certain point it will add too much motion and fabricate new movement out of nothing.
start_at_step and end_at_step: This is on what step the sampler stops generating and passes the unfinished latent data to another sampler. In many image generation workflows, this wouldn't be used at all, but with Wan 2.2 it's necessary due to the two model architecture. The top sampler, for high noise, should always start at 0. The end at step value should be the same as the start at step value for the low noise sampler. This can vary from anywhere to 10% to 50% total step count. So, anywhere from 10% to 50% of the steps are spent on high noise and the rest go to low noise. the The end at step value for the low noise sampler can be left at an arbitrarily high value; it will stop at the total step value automatically.
There is a whitepaper written by the Wan research team about the optimal step ratio, and there is even a custom node (MoEKSampler Advanced) that will use this boundary for you if you look for it, although it is not maintained. This step ratio is confusing, though. It reads as 0.9 for I2V, which would appear to mean 10% of the steps on high noise, but in reality this ratio changes with your sigma shift value. For a shift value of 8, which is what most people tend to use or at least start with, this actually results in a 50/50 split between high and low noise. When you use acceleration, things get even less concrete. I'll often use 2 high noise steps and 10 low noise steps for example.
cfg: Classifier-free guidance. This value controls how closely a generative AI model follows the provided prompt. Higher means stricter prompt adherence and less creativity. In theory, this sounds like higher values are better. In practice, lower values are often better. I couldn't explain to you the science behind it, but essentially you want the AI to be creative if it is trained well enough.
CFG values for Wan can vary quite a lot. The provided starting values are 3.5 for both high and low noise models. When I used to generate without acceleration, I would use 3.5 for high and 1 for low, so that's the values we'll try for now. If you use acceleration, the recommended values are between 1 and 2 for high, and always 1 for low.
sampler_name: This is the algorithm that the sampler uses to transform noise into the result we want. Euler is the default and the simplest and fastest sampler, but personally, I've never gotten anything but bad results using it unaccelerated. Euler works great with accelerators though. If you can afford to, I would encourage you to experiment with different samplers. When it comes to generating without accelerators, I found that uni_pc and lcm work the best in my experience. When accelerators are used, I like euler and dpmpp_sde (aka DPM++ SDE).
scheduler: This algorithm determines when the steps are executed using the sampler algorithm, hence the term scheduler. As above if you can afford to, it is worth experimenting with. From my own experience, the only schedulers that work well are simple, normal, and beta. But I haven't tried all of them.
return_with_leftover_noise: These can be left at default. As with "add_noise," we want the high noise model to retain the leftover noise so the low noise model can work with it. After the low noise model is done, the video is done generating, so no noise should remain.
VAE Decode
This is where the latent image data is transformed back into pixels. You can also use a VAE Encode node to transform a normal image into latent data, used as prompt data for a model. That's what we did with our start image, although the encoding part is baked into the WanImageToVideo node so we didn't need a separate node for it this time.
Create Video
A batch of images is used as input and a framerate is chosen to create a video from those images. You can also provide an audio input, though we aren't bothering with that. Generally you want this to stay at 16 FPS because it's what Wan is good at. That seems low, but later on we can use interpolation to solve that problem.
Save Video
The most basic video file creation node. We won't be using this soon because it's inconvenient. Video files are stored in ComfyUI\output\video. You can't change this location or the filename which is automatically generated. Always remember, you can drag the video files into the ComfyUI workspace to load the workflow used to generate it.
Generating the Video
The interesting part. You may have skipped down here, and I don't blame you. But when (not if) you eventually run into issues, I'd recommend you at least skim through some of the above text and see if it helps your case.
However, there are two bare minimum changes we have to make to this workflow because it assumes you're running some kind of research-tier supercomputer and it's just obnoxiously inconvenient. And unfortunately it means we have to download custom nodes.
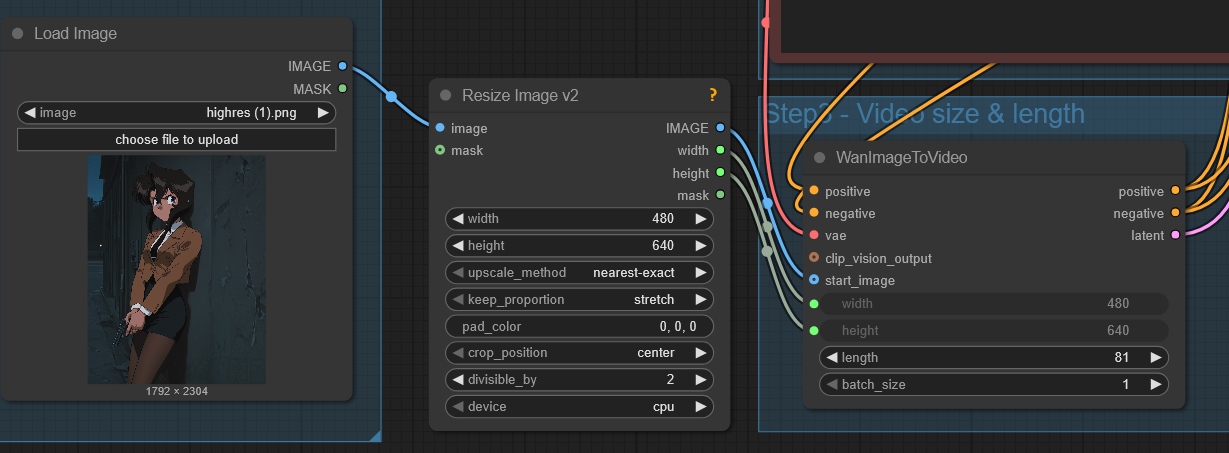
Add a Resize Image node
Unless you want to use external image editing software, you'll want to add a node to resize your input image to the dimensions of the video. We'll use ComfyUI Manager for this.
On the top right, click Manager and then Custom Nodes Manager. Then type in ComfyUI-KJNodes and click Install. You'll have to restart ComfyUI for the custom node to be recognized. Alternatively, you could download the videos I've posted in this article, drag them to ComfyUI, and let it install the nodes automatically when it prompts you.
Adding the node is as easy as double-clicking on a blank spot in the workflow, typing "Resize Image v2" and clicking the result that appears in the search. The node will appear, and all you do now is click and drag the "image" output from your Load Image node into the input of Resize Image, and the output of Resize Image v2 into the "start_image" input of WanImageToVideo. Congrats, you just connected your first node. Pick "lanczos" for the method because it preserves the most quality. If you want to make your life easier, you can connect the "width" and height" outputs to the "width" and "height" values of WanImageToVideo. This makes it so that the dimensions of the video are always the exact same as whatever dimensions you resize the image to. They'll become greyed out, meaning that those values will copy whatever's in the Resize Image node.
Change out the safetensors models for quantized versions
I explained this in the "Load Models" part above. We need to change out these models because they're not even scaled down. You need a ton of memory to use the models linked in the notes of the workflow, which virtually nobody has. And ComfyUI's core nodes don't support this type of quantization.
First you'll need to download the quants. Go to https://huggingface.co/QuantStack/Wan2.2-I2V-A14B-GGUF/tree/main and in each of the HighNoise and LowNoise folders, pick a quantization. You'll have to choose for yourself because I don't know what your hardware is. The way it works is: the higher the rank number, the better the quality, but the more memory it will use. I use Q6_K with a 5090. Then you'll need to save them to ComfyUI\models\unet. You may need to create that folder if it does not exist.
As before, install a new custom node package, but this time it is called ComfyUI-GGUF. If you dragged one of my videos into your workflow and installed them automatically, it shouldn't be necessary.
Next we replace the model loader nodes. As with the Resize Image node, double click and search for "Unet Loader (GGUF)" and add the nodes, for both high and low noise. The model files you downloaded should populate in the drop down menu. Connect the "model" output to the ModelSamplingSD3 nodes. You can click on the old model loader nodes and push "delete" on your keyboard to get rid of them.
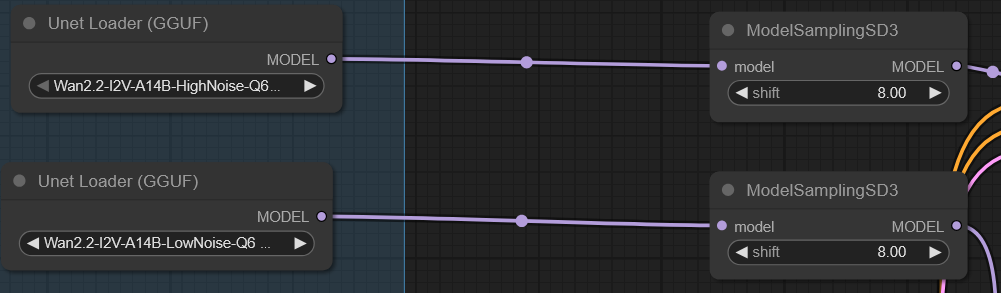
If the model files aren't listed, be sure that they're in the right location, and that you've restarted the ComfyUI terminal app, as well as refreshed the browser page. You'll need to do this each time you install custom nodes.
Now we can finally generate. I'll provide the parameters I used to generate this video.
Input Image

Resolution: 480x640
Length: 81
Positive Prompt:
The camera is stationary and remains still. A woman wearing a tight black pencil skirt is leaning with her back to a wall next to a corner in a dark alleyway. She steps around the corner, and aims her pistol to the right edge of the frame, firing twice. Each time it fires, a brass bullet casing flies out of the top of the pistol and a bright muzzle flash appears from the end of the pistol. Her stance is professional and tactical. You may have noticed I described her skirt in the prompt. Why? Because in some of the generations I made, Wan interpreted the skirt as high-waisted shorts, so I added that to make sure that wouldn't happen. But you want to minimize the number of tokens (words) you use when writing your prompt so it can focus on the parts that are actually important.
Negative Prompt:
purple sparks, revolver, camera zoom, zoom in, camera pan, camera tilt, camera shake, moving camera, rapid mouth movement, speaking, bad anatomy, mutated anatomyshift: 8 high, 8 low
noise_seed: 484231864644320
steps: 28
start_at_step/end_at_step: 9
sampler_name: uni_pc
scheduler: normal
cfg: 3.5 high, 1.5 low
When you have all these entered into the different nodes, you can hit the blue "Run" button in ComfyUI, and away it will go. It will take some time, at least 5 minutes. If you realize you messed up, you can cancel the run by hitting the red "X" next to "Run" or by right-clicking the spinning wheel in the Queue sidebar and clicking "Delete."
During this time you'll have to avoid doing anything that will use your GPU if you're running this on your own PC. I can just about watch YouTube videos on my 5090 while generating but that's it.
You can track the progress on the top and in the workflow (the current node it is working on is highlighted in green). When it gets to the KSampler node, the percentage value on the progress bar is based on steps. So if the high noise sampler is performing 5 steps, it will go up in 20% increments. If you have an error, it will highlight the node that threw the error in red. You can also see the progress bar on the node itself.

The Queue sidebar on the left is where you can see the artifacts generated by each of your workflow runs. It will also report the time taken, in seconds, to generate the artifact. Ignore the stupidly long time for the video in the screenshot there, I was experimenting. Yours likely won't take that long.
Here's the finished video. It has a couple of minor flaws and doesn't adhere perfectly to the prompt (she fires more than twice), but it's certainly not bad especially for a first generation. Wan even tried to animate the pistol slide reciprocating. This is just the nature of working with 480p resolution, most of the time. Just like image gen, the results you get at low resolution aren't that great. Also, please note that if you use a different quant than mine (Q6_K), you will get a different video.
Analyzing and Correcting Errors
I'm referring here to errors that Wan makes in generating the video, not errors that prevent the video from generating. There are telltale signs one must look for and correct accordingly if they have a limited budget and want to work towards a better video instead of a worse video. To help understand what to look for, I've provided some of the other generations I made in writing this article that weren't as good as the final video above.
If you're interested, you can download any of these videos and drag them into ComfyUI to see exactly how they were generated.
Error: The pistol changes into a revolver. The muzzle flash is out of frame. Her grip changes from left-handed to right-handed. The revolver keeps morphing as it fires.
Solution: There are too many steps assigned to high noise. This causes a major change in the video, in this case the pistol and her hands changing shape, when it shouldn't. Either assign more of the steps to low noise or reduce the total step count. Sometimes assigning more steps to low noise allows Wan to realize that it made a mistake and correct itself in a later step.
Note: If you are trying to generate a video using a LoRA, this error may mean you need to increase the strength of it. For example, if certain appendages don't look how they should.
Error: She turns completely around before firing. There are too many sparks and flashes. There are no spent casings flying out of the gun.
Solution: Prompt error. Here, I used this prompt:
The camera is stationary and remains still. A woman wearing a tight black pencil skirt is leaning with her back to a wall next to a corner in a dark alleyway, peeking around it to the right. She steps out around the corner, turning to the right, and aims her pistol, firing twice. Two bright muzzle flashes light up the alleyway from the end of the pistol. Her stance is professional and tactical. A brass bullet casing flies out of the top of the pistol each time it fires. "Turning to the right" is overthinking it. Keep in mind that the CLIP may or may not take your words out of context, so try to be succinct as possible while still being descriptive. Also, too many steps on high noise, as above.
Error: Obviously, the entire video is dark, with a few motes of light.
Solution: Change your scheduler, and if that doesn't work change your sampler. Here, I was trying to use karras. exponential also gave me similar bad results.
Conclusion
We certainly got a video. It's cool, but despite our best efforts, it still has some flaws. The biggest flaw, however, is the workflow itself. On my machine, this took about 7 minutes to generate. That's pretty bad for a 5 second video. There will be cases where you need to generate variations of a video to get it exactly right, so you want it to be as fast as possible. In the next article we'll focus on improving the workflow now that we understand the very basics of what our nodes do and how the video is generated.