

Z-Image Turbo is an amazing model and it just very well may dethrone Flux as my all-time favorite model. Though I still love Flux Krea and Flux Kontext...unfortunately Flux 2 was pretty slow on my machine (I have a 3090Ti) and so as release timing would have it here with these two models, I am currently playing around with Z-Image Turbo instead of Flux 2. Z-Image Turbo is much faster and the quality is great. I can't wait to see img2img workflos, because that's where Flux 2 may really have the edge. We'll see.
So, how about LoRAs?! Yes, I've trained a LoRA for Z-Image Turbo (here) and I did so with some new tools. It was a great learning process so I figured I would share my findings with others! I hope these notes serve someone well in the future here.
The Tools
First, I used Ostris' AI Toolkit to train the LoRA. It's a fantastic tool. In the past I've used ComfyUI to train Flux LoRAs as well as Civitai's on-site trainer. Here's a link to the AI Toolkit: https://github.com/ostris/ai-toolkit/
The UI is excellent with AI Toolkit and there's a really important feature I'll get into soon here. The other other tool I used was Gemini. I actually had AI help me write captions for things. The other AI tool for captioning I used was this one right here (using the "Flux Prompt" option): https://describeimage.ai/ it was also terrific.
Note: I've included the config file that I used in the attachments of this post. You'll need to adjust the directory paths for things in it.
Also note, if you do not have a GPU to train locally (and don't want to use Civitai to train) you can very quickly and easily get set up with AI Toolkit on Runpod. There is an official image there so you just basically select the AI Toolkit image, choose an instance, go to the environment variables and set a better password, run it, and you'll be able to open your web browser to use the AI Toolkit UI. It's very convenient. Fair warning this is my Runpod referral link but you will get some free credit for signing up too if you don't already have an account (maybe enough to cover a LoRA training). I would use the RTX 4090 for best cost efficiency but the cheaper A40 does do the job, it just takes longer.
Datasets & Captions
For my style LoRA I used 84 images. This is quite a lot, typically 20-50 should do. I would seldom use more than 40 with Flux. Honestly, I'm not sure if you need to use more and if you do end up using 100+ images, you really need to be careful not to send mixed signals. Curation is really important for LoRAs depending on what you're doing. In my case I was able to curate some pretty varied examples that all had similar features for the style I was after.
Again, for the captions, I used AI but I also reviewed and made some edits. I used long form captions which is important for Z-Image (hence why I tried to lean on AI because I'm lazy and have limited time). Flux style captions/prompts/description is great. Though I also started using a slightly different approach where I used a Z-Image prompting guide. You can find that here: https://gist.github.com/illuminatianon/c42f8e57f1e3ebf037dd58043da9de32
There's a specific format that I followed and perhaps the most important guidance here is using between 80-250 words.
The Training Config
The juicy part here for my notes. I followed videos from Ostris' YouTube channel, asked and read around on the Discord, and found other content online to refer to...but the "defaults" or common settings didn't work well for me. They were ok, don't get me wrong, the first version of my LoRA did stick strictly to those defaults. I just wasn't getting what I was after, close but not quite.
So where did I deviate?
I changed the batch size, learning rate, and rank mostly. I also used the experimental "differential guidance" setting (leaving it to its default scale of 3). Here's a screenshot of what the config looks like in AI Toolkit:
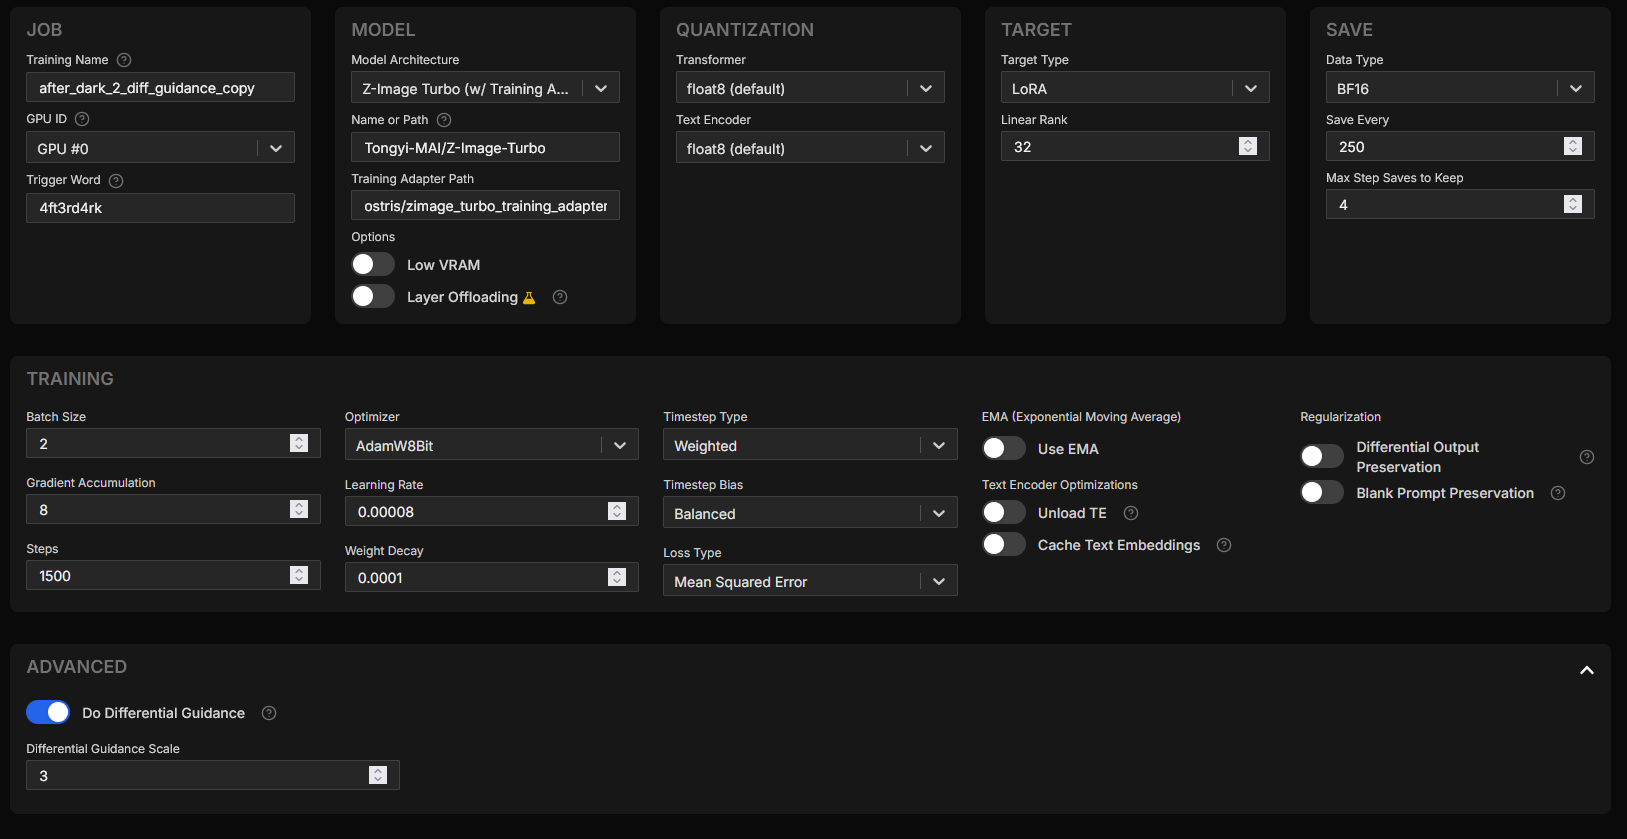
I took off "Low VRAM" setting, though maybe offloading a little may have been better. My overall training time was over 10 hours. I was between 30-40 seconds per iteration. So really long time. Though you'll notice my steps are at 1500 (instead of the default 3000), this is because I increased the effective batch size to 16 (batch size of 2 * gradient accumulation of 8). When your batch size goes up, your steps should come down.
Also, note that I chose to use a trigger word. I believe this helps, but I know style LoRAs do not always use trigger words.
Batch Size & Steps
The tool's default is 3,000 steps with a batch size of 1 that makes for "3,000 views" of the data. The 1,500 steps with batch size of 16 is "24,000 views" of data/images.
Yes, this led to longer training times. The settings also had the seconds for each iteration increase as well. So overall training the latest version of my LoRA was significantly slower than the first time around.
Additionally, because I had 84 images, increasing the steps here (with the batch size) would have fried the model. It would have been over fit. Note: That means if you do not have as many images, you will need even fewer steps (at a batch size like this).
I did have the batch size higher, but it wasn't fitting into VRAM, it was thrashing, so I had to decrease the batch size from 4 to 2.
Again, all of this depends on the hardware. If you use a GPU with more VRAM, things can change and you can get faster training.
If you do not have 24GB of VRAM, then you are going to want to toggle "Low VRAM" on so it can offload a bit or you will need to change your effective batch size...but here's the thing - that effective batch size (batch size * gradient accumulation) is very important for the success of the trained LoRA.
Imagine trying to learn something by looking at one thing at a time. It's difficult. You'll constantly be changing your opinion on the matter. Same with AI. If you're training a character LoRA you might be ok with a smaller batch size. Here's how the value of 16 helped the style LoRA:
"Okay, 4 are dark, 4 are bright, but all 16 have a green tint."
Conclusion: "The lighting varies, but the Green Tint is the rule."
Update: It updates only the Green Tint weights.
Now here's how it would be if it was one by one:
Image A (Dark): "Oh, everything should be dark!" (Model darkens everything).
Image B (Bright): "Wait, no, everything should be bright!" (Model brightens everything).
My LoRA was going for a dark style, so if it saw one image that happened to be bright or have bright areas and it couldn't compare against other images together, it would be zig-zagging there.
The gradient accumulation is super important here, especially with a distilled model. Even with AI Toolkit's adapter.
Having the non-distilled version of the model will help and indeed Ostris created a de-distillation of it that may help...but I have not tried training with it yet. Even still, you want to be mindful of batch size if you're training a style LoRA as these concepts still hold true.
Rank & Learning Rate
The rank was another super important setting. It determined how much "memory capacity" the model had to learn two conflicting concepts: Vintage Style vs. Sharp Text for example.
This is likely one contributing factor to some of what I've seen with many LoRAs out there for Z-Image. It's quite common to see text or other qualities degrade. I've even seen some LoRAs that are described as "detail enhancing" that unfortunately result in worse details. You'd be better off not using a LoRA at all and if you've ever thought that about a LoRA - this may be one reason why.
There's fewer trainable parameters with a lower rank and that can be a good thing too. It becomes harder to "break" in that they become very specialized and focus on the strongest signals. However, if it's too low, then it can't tell when not to do something. So it can destroy some of the other qualities of the model, ie. blurry text or loss of fine details, lose of skin texture maybe, or something else. You've probably seen this in generated images before when using either specific LoRAs, specific LoRAs at certain strengths, or too many LoRAs at once.
Yes, lowering the model strength of a LoRA can help compensate and save quality from being lost, but you are also doing so at the cost of the effect the LoRA has, making it less effective at doing what you wanted it to do.
Higher rank isn't always great though because it can leave you more vulnerable to overfitting...and this is why the steps aren't set too high in my config.
I think the sweet spot for Z-Image Turbo is a rank of 32. The default is 16 though and you'll likely run into many, many, examples where it is 16 and that may be perfectly fine. It wasn't in my case and I wouldn't at all be surprised if that isn't a huge reason why many LoRAs are unstable and take away from the details Z-Image has inherently.
The learning rate was also reduce from the default. By lowering the rate just slightly (from 1e-4 to 8e-5), you are being gentle enough to inject your style without breaking the fast-inference capabilities of the base model. This is important for the distilled version of Z-Image.
The default LR is 0.0001 and I changed that to 0.00008 to help here. This may not be so necessary if using the non-distilled version of the model to train from. This is because Z-Image Turbo is designed to generate images in 8 steps. It's brittle. If things were still converging at 20 steps or 30 steps, then it'd be a different story.
Here too, it's a balance. Going lower would require more steps and longer training, the learning rate wouldn't be fast enough. So I didn't want to go too low. I felt that default of 1e-4 was too aggressive, but it's not a bad starting point either.
Differential Guidance
Last thing to touch on is differential guidance. This feature in AI Toolkit is perhaps a bigger reason for success in hanging on to details like text than lowering the learning rate.
In the photography style LoRA I was training, I wanted to introduce imperfections like film grain and soft focus. Soft focus is a huge part of what makes an image more realistic because while we can shoot photos at f/8, we don't always do so. Often times portrait photography is at f/4 or lower and the more creative, intimate, photos are at f/2.8. Sorry, I should probably explain that a bit if you're not familiar with photography, but the short of it is depth of field (I won't get into smearing Vaseline on your lens filter, which no one does anymore haha). The entire subject isn't in focus and that's desirable because we want to put the focus on specific areas. Unfortunately this messes with fine details and text.
This differential guidance feature that AI Toolkit has is our hero here. I would turn it on for style LoRAs and keep it at it's default guidance scale value of 3.
I'm not going to go into detail about it, but Ostris has a YouTube video on training LoRAs for Z-Image and he talks about how it works here
It's a great video in general, but again, my settings are different from what you see in this video.
Example Time!
Let me show you some of what I'm talking about. I'm not going to call out which LoRA I found that results in some of what you're seeing and I'm going to even try to use my own - I don't want to point fingers or anything. We're all learning, including myself. I don't exactly train dozens of LoRAs, I've trained a small handful. I'm not working in AI either. While I'm a programmer and I enjoy learning about this stuff, I'm no expert and have no reason to work with this stuff on a daily basis. My stuff is as bad as anything else out there too, but the entire point of me sharing here is because I found something that worked really well. I'm hoping this works for you too.

Everything about the above two images is the same except one has the LoRA model strength at 1.25 while the other has it at 0.65. The details were destroyed and the effect (dark, low-key lighting, photographic styling - this is my AfterDark v2 LoRA) is beyond overdone on the right. It's fried and details are lost.
Do not use LoRAs at this strength level. I'm not sure any LoRA is going to really work at this level, certainly not with the distilled version of Z-Image.
So again, my first advice when using any Z-Image LoRA is to reduce the strength if you're running into trouble.

I've now added a different LoRA to the mix here (not my own on the left). I won't say which LoRA this was, but I will say that this is not the desired effect. The strength of the model here is 0.65 as well. Let's look at it closer up.

Notice the detail is lost a bit, particularly around the eyes (this LoRA was not intended to be one for illustration style). Here's my LoRA at the same strength:
Yea, some of the skin texture may be a little weird here. A different seed may help, post-processing, adjusting LoRA strength, etc. However, the detail is not lost.
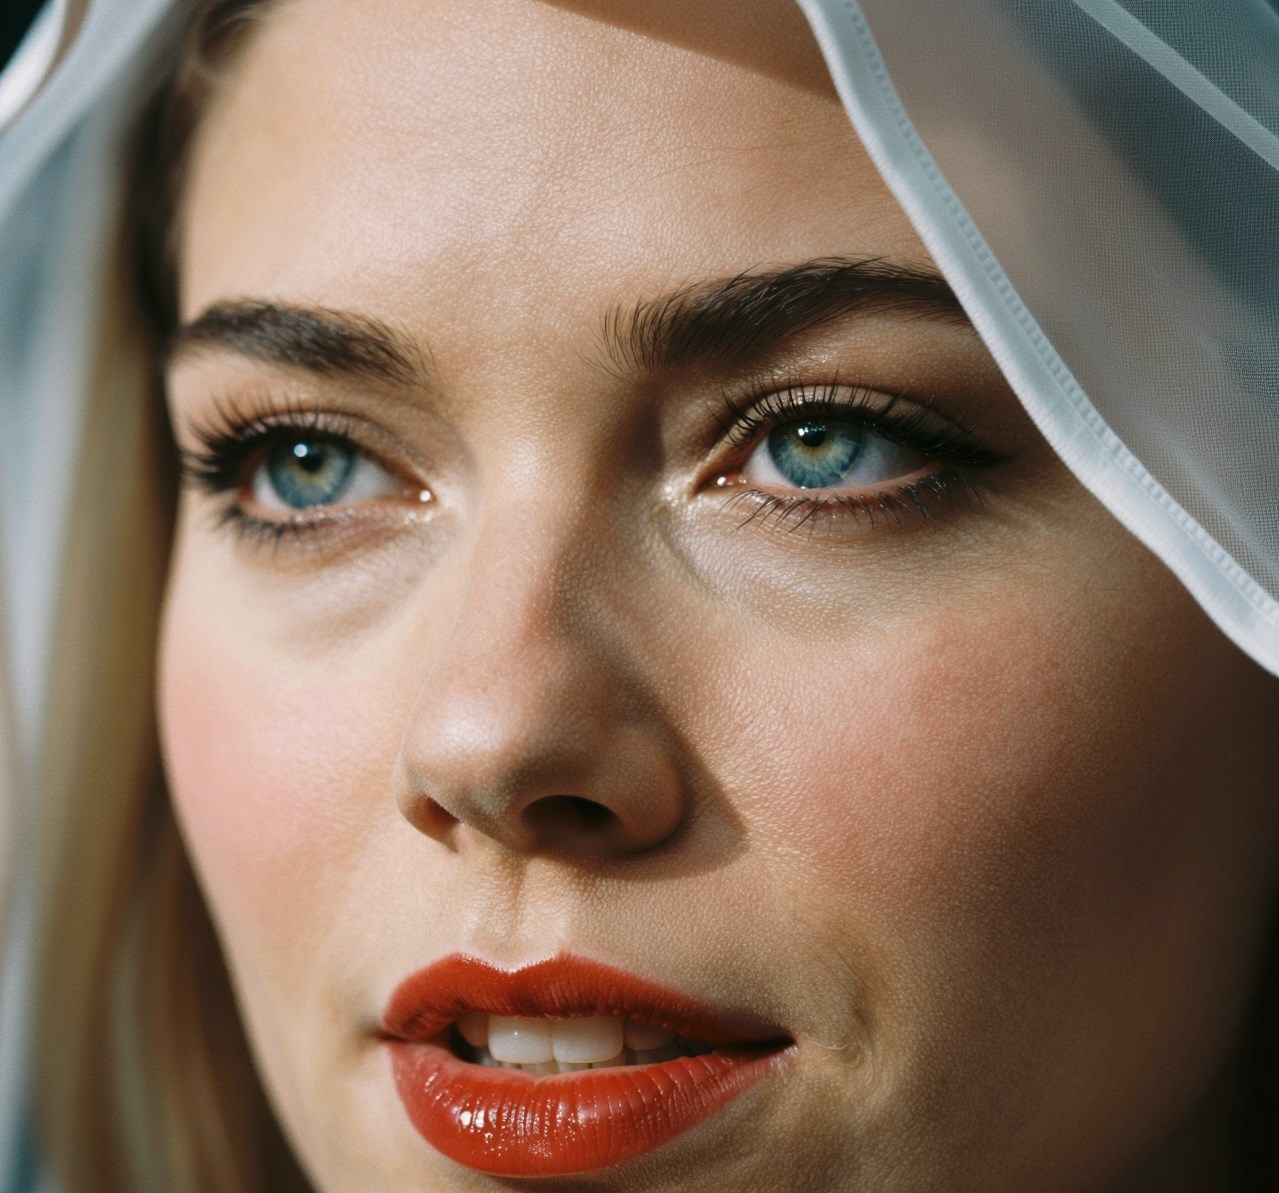
Here's the image without any LoRA at all.

Not bad, right? My LoRA is designed to make the lighting more dramatic, add more contrast, and make things darker. Very evident if you look around the eyes. The shadows are enhanced there to the point you might think it's eye shadow or something. It's not, as you can see on the left, it's just the direction the light source is coming from.
Side note: I'm not sure what's up with all the "peach fuzz" that Z-Image has, but I've noticed some furry faces lol. Well, looks like this specific example, you're choosing between some slightly off looking skin texture and lots of hair. I don't know what to say.
So let's put all three together, from left to right; no LoRA, LoRA 1, and LoRA 2 (my AfterDark v2).

Even the first version of my LoRA was pretty good here, otherwise I'd show a comparison of that. Again, the "hit rate" of the first version of my LoRA was not as good as the second version. I had to go through many generations to find something I really liked. The second version is simply stronger, it is more refined and the loss was better.
I went from a 0.71 to a 0.336 loss between version 1 and version 2 of my AfterDark LoRA. Dramatic difference, though loss isn't always everything and you can still get good results with something that measures high in this department.
Final Thoughts
For many of the LoRAs you find out there, especially with Z-Image, try turning down the strength.
I think the LoRAs that focus on illustrative style are going to be better off. I'm not sure if photographic style, realistic or detail enhancing LoRAs will add much for Z-Image to be honest. They run a big risk in destroying some of the details and quality. That's going to be the challenge. Hopefully my initial experiences here help someone with that. Give the settings a try, the AI Toolkit project is amazing for training LoRAs, I high recommend it.
The other tip I'll leave you with is go ask AI for help! Funny as it may sound, I learned a lot from Google Gemini. I didn't have to nag someone on a Discord server to explain it to me like I was 5 or anything. I got instant answers, I could ask as many clarifying questions as I wanted without being a hassle. Google Gemini also let me create a Google Doc with its canvas function to store my training notes. I copied and pasted screenshots of AI Toolkit output to ask if things looked good and it happily read the screenshot and explained what was going on and if it was good or not. So it was super handy.
Please do check out my AfterDark LoRA here: https://civitai-proxy.pages.dev/models/2176378 and let me know what you think! Share some images. More examples are very helpful because I'm trying to think what I might work on for a 3rd version or possibly a completely new LoRA.