Full Image to Video Workflow Walkthrough
This is my full workflow December 2025 for videos animated using WAN 2.2. I will walk you through every step for beginners, trying to leave nothing out. Reach out to me if you need assistance troubleshooting or if you have something you are having trouble generating.
The main reason to use this workflow is to generate NSFW animations. If you want SFW you are better off just using the closed source models such as Kling or Grok imagine. They take advantage of huge cloud GPU resources, so they generate super-fast and at native high definition but have silly content restrictions and strong style bias. This workflow provides some freedom to experiment and generate without content restrictions, but is limited by your hardware, and the available open-source models.
I run this workflow with only 4GB of VRAM and I expect you could do it with even less if you are ok with waiting longer and generating shorter videos.

Open Workflow
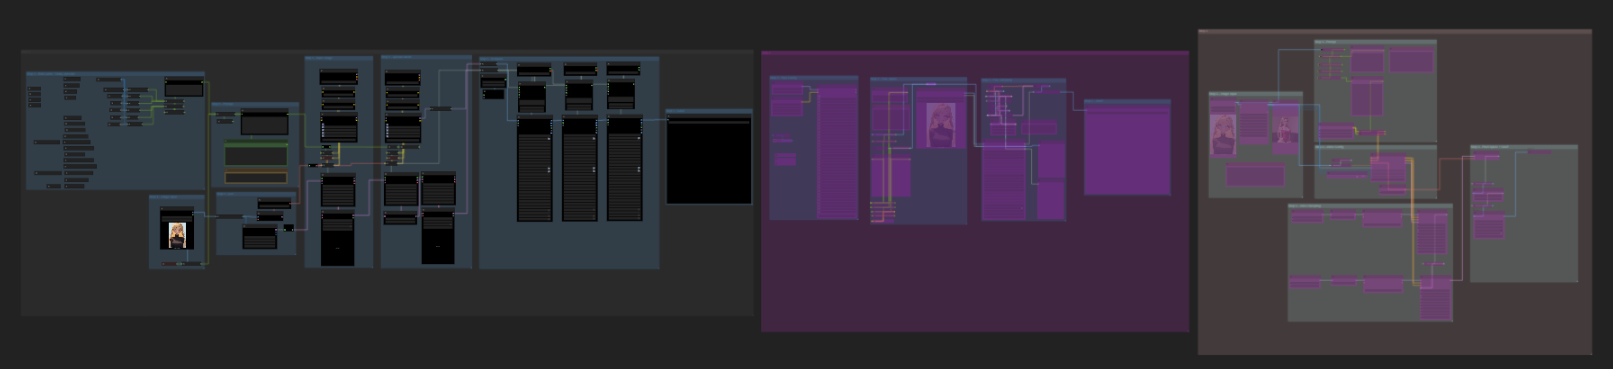
Download and open the workflow attached to this article.
Unzip the folder
Drag the .png workflow image into the ComfyUI canvas
You will need ComfyUI installed. All the custom nodes are available through the ComfyUI manager. Simply open the workflow, open the ComfyUI Mnager window and select "install missing custom nodes"
This walkthrough and the workflow starts from left and works to the right.
Step 1 - Generate Base Image using SDXL model(s)
Bypass steps 2 and 3 in the workflow -- this workflow is set up in stages and I only move to the next stage once I am satisfied with the work in progress. I also typically will generate large batches in a specific style with many images at once at each stage.
Prompt for the base image.
There are 3 basic inputs available -- image, wildcards, and text. You can use any combination. For this example, I will use an input image and text so I will bypass the wildcard group.
If you are using wildcards, you can expand each JSON node and directly edit the wildcard lists, so you are prompting using only he wildcards you want.

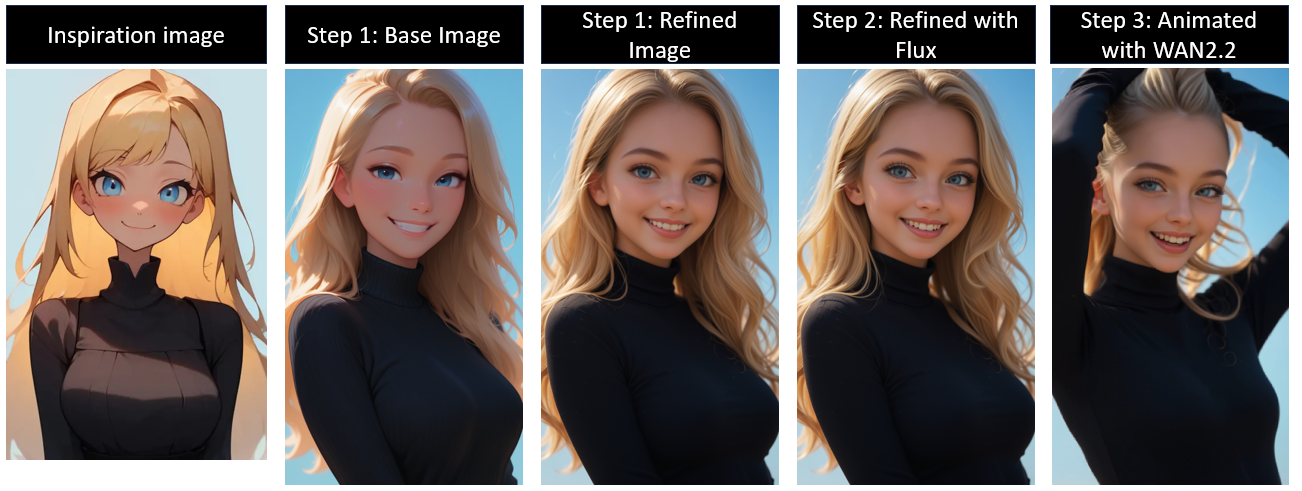
I will use this inspiration image in this example Image posted by FuzzySnakes.

Add the inspiration image to the image load node. If you do not have it already, it should automatically download the first time you use the WD14 tagger node.

Add text prompt. I will use "big smile, teeth, sky, day" for this example. There is no need to add tags that will already be in the inspiration image. The WD14 tagger will add those for me. I have a pre-set list of quality tags I use. You should edit these for the style you want to generate.

Set size. I typically will use 1024x1024 (square) or 768x1344 (9:16 vertical). You can generate an image and crop it later for animation.

Adjust the Step 1 config for the base image and refined image nodes. You will need to download the checkpoint models and add them to your comfyui/models/checkpoints folder and the LoRA models to your comfyui/models/Lora folder.
Recommended checkpoints:
WAI-illustrious-SDXL - v16.0 | Illustrious Checkpoint | Civitai
CyberRealistic Pony - v15.0 | Stable Diffusion XL Checkpoint | Civitai
CLIP: use the checkpoint built in CLIP model. If you are using a model without a build in CLIP, follow the guidance for that model on which model you should use.
VAE:sdxl_vae.safetensors · stabilityai/sdxl-vae at main
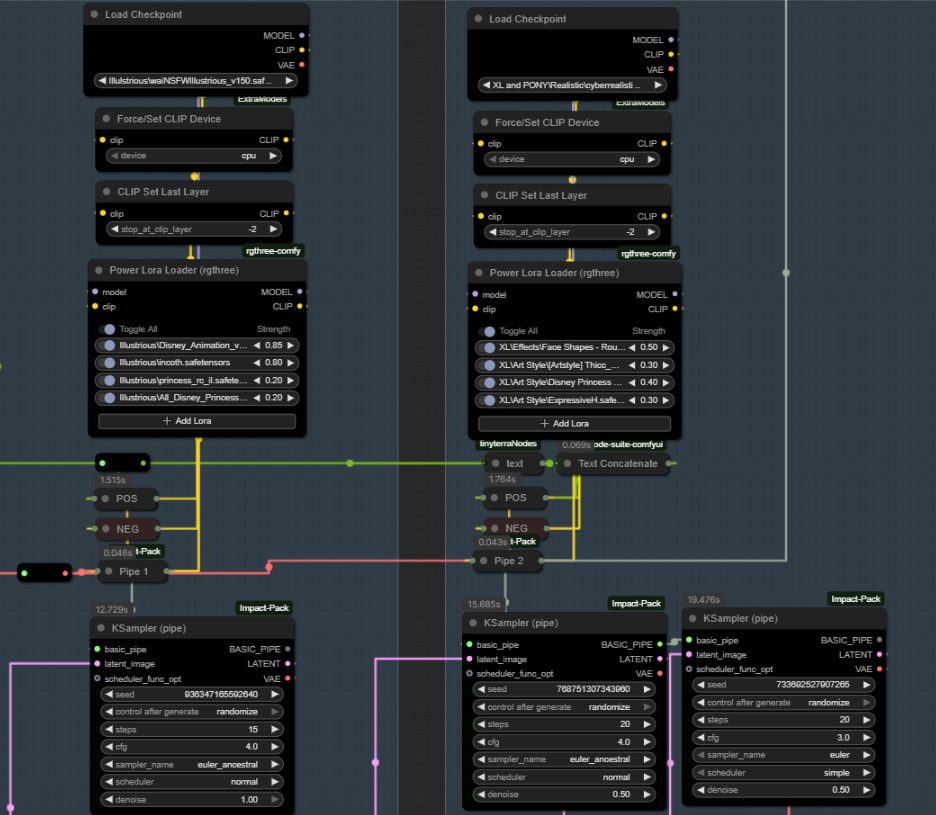
Note on Denoise: I use higher denoise than most between samples. I just prefer the results. Typically, you want to denoise between 0.4-0.6 between the two models to keep the elements while shifting style. Between the two Ksampler nodes on the refine image stage, there is a high-res fix upscale latent, and some people will only denoise ~0.2-0.3 at this stage. Think of the denoise as the percent change from the last image, so 50% is changing about half the pixels from the previous image. (it is more nuanced than that, but thinking of it in this way will help you when choosing which settings to use)

Look at Civitai Model pages for the recommended steps, CFG, sampler, and scheduler and adjust the Ksampler node settings accordingly.
Guidance on using multiple models: You can use multiple models to mix styles. I love using WAI illustrious for a base image then Cyberrealistic Pony to refine giving a "realistic anime" look while taking advantage of the amazing prompt adherence and trained characters from illustrious. I do not recommend trying to mix across model architecture such as SD1.5 and SDXL. SDXL, Pony, and Illustrious are all the same architecture and work well together. If you want to use the same model you can reroute the node connections to the basic pipe nodes, so you only load the model once.
Configure the detailer group. You may need to download the SAM, and BBOX models the first time. There are many trained detailer BBOX/SEGM models available on civitai. Download any the BBOX models in ./Comfyui/models/ultralytics/BBOX and the SEGM models in ./Comfyui/models/ultralytics/SEGM. If you add any models make sure to go back to your ComfyUI canvas and press the R key to update so you will see the new models in your drop-down menus. Many detailer models will be available directly through the ComfyUI manager. For the text input on detailer nodes, I do not put anything. Adjust the sampler settings according to the checkpoint model recommendations and use a denoise between 0.4 and 0.6.

Run Step 1 workflow
press the run button in the ComyUI or press Ctrl + Enter.

View the progress and results, adjust your settings and prompts if needed. If you are satisfied with the results, move on to step 2.

Step 2 -- Refine image using Flux (optional)
Bypass steps 1 and 3 (highlight the nodes and press Ctrl + B or right click the group and select bypass group nodes).

Enable step 2.
Adjust your Diffusion and CLIP models. If you don't have these models, you can download them here. Drop the Flux model in your /ComfUI/Models/Unet folder and the CLIP model in /Comfyui/Models/CLIP folder

Add the step 1 image to the load image node.
You can drag the image in from your file explorer, click "choose file to upload" or just right click the image in your save node from step 1 and select copy to clip space and paste from clip space in the load image node.

Paint the mask
Right click the image in the load image node and select "Open in MaskEditor | Image Canvas". Paint the mask on the areas of the image you want to refine. If there are many areas, I recommend doing smaller areas at a time such as only the face, then a second pass for the background or clothing, etc. This node setup will expand the image and be able to refine details much better in smaller areas.

Note on masking: Flux has some pretty specific style bias, but it is one of the highest fidelity open-source models. If you mask out areas such as skin and especially gentiles or breasts, it will usually completely ruin the image and you will have to go back a step. You will need to experiment with styles that you can be more liberal with the mask and those you need to be very careful. I typically want Flux to refine eyes, ears, teeth, and hands. Sometimes I will also refine hair, clothing, and backgrounds. There is some stretching in the example from the inpaint crop node stretching to a square, but it didn't effect the results. Sometimes stretching can cause poor results and you will need to adjust the output target height/width to a different shape.

Click "Save" to save and close the MaskEditor.
Edit the prompt for your image. Note: There are auto prompt nodes built in, so you should just prompt for LoRA trigger words and overall style. (I have included what I typically use for 3d animated styles and realistic styles.)

Set the denoise level for the inpaint pass. For realistic styles I use between 0.5 - 0.65, for 3d animation style I use 0.6, and for anime/cartoon styles I use 0.4. For this example, I am using 0.6.
Run step 2 by clicking the run button or pressing Ctrl + Enter.

Review the output and refine further by repeating step 2 until you are happy with the image and are ready to animate. This is the end of the image generation portion of the workflow.

Step 3 -- Animate image using WAN 2.2
Bypass steps 1 and 2. Enable step 3.

Input Image: Copy (clipspace) and paste (clipspace), click and drag from file explorer, or "choose file to upload" to input your image into the input node.
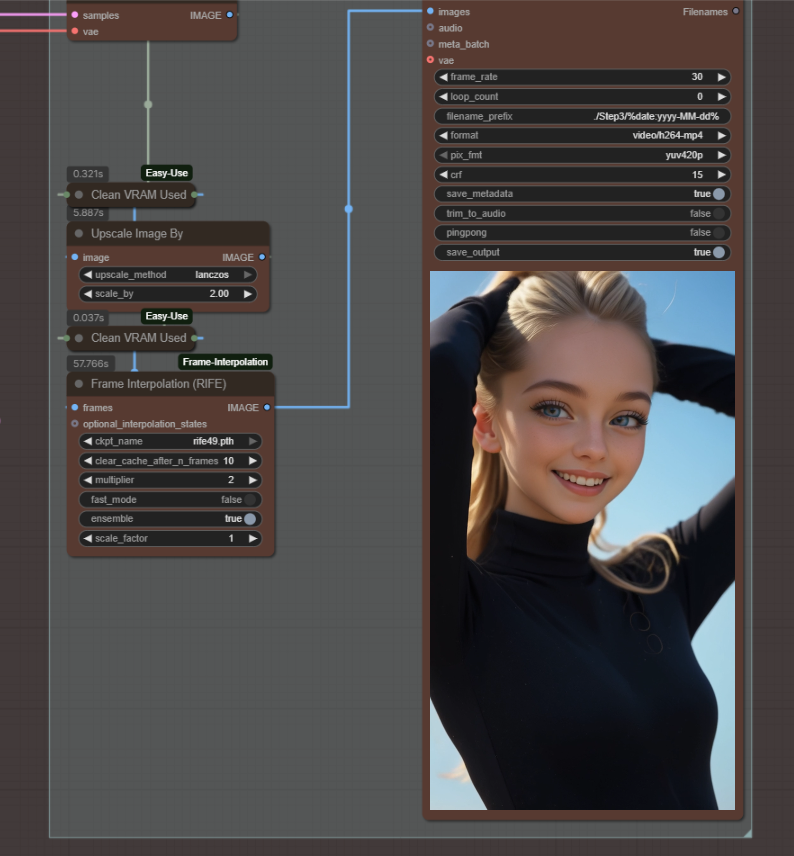
Select your image size into the width and height inputs in the resize image v2 node. My hardware can handle 636 x 636 for a ratio of 1 and 480 x 848 for 9:16 images for 100 frames. You should experiment and test what your setup can handle. In general, higher resolution will have better details and fewer artifacts up to 1080.

Set your video prompt. In my experience, simple is better than complicated, but you will need to experiment based on what you are generating. This workflow includes an "auto prompt" similar to the previous steps so the basic features of the image you can skip and just prompt for LoRA triggers and the animation movement you want. If you don't have the auto tagger models, the first time you run the workflow they will download automatically.

Set your video sampling frames length. The final video will be longer after frame interpolation. I use 100 which results in a 6 second video.

Configure your WAN model.
I recommend trying this model merge: Smooth Mix Wan 2.2 (I2V/T2V 14B) - T2V High v2.0 | Wan Video Checkpoint | Civitai
Shift: I use 8. You can experiment with 8 - 11.
LoRAs: add both the high noise and low noise versions (or only high if you are just doing motion. You need Low if you are adding an element that is not trained in the base WAN model)
Ksampler settings: I use 6 steps at a CFG of 1, sampler Euler, scheduler Simple. You can experiment, but I don't see much of a quality increase from tweaking these settings.

Run Step 3 by clicking run or pressing Ctrl + Enter.
Feel free to reach out if you are having issues or are trying to recreate anything specific and I will do my best to assist. Input and feedback are welcome. Have fun generating!
