

.jpeg)
Comprehensive Guide on LoRA Making with Multiple Outfits
An Updated Version of my Previous LoRA Guide from a year ago.
This time with Concept/Pose LoRA, Quick Style LoRA, Non-human Character LoRA,
Multi-Character LoRA, 10+ Outfits LoRA and last,
but not least an entire Video Guide with a Full Tagging Course in a Google Doc!
The entire Training Process is completely Free and Full Tagging Course is also fully free.
The Guide has been made by yours truly, Khanykov01 and my assistant miss Songque!
!Now a quick warning!
This Guide covers how to Train LoRAs with Google Colab by Hollowstraberry, not how to train LoRAs with other Colabs/Programs!
The Guide is extremely long, don't expect to just breeze through it!
THERE IS NO TL;DR, Read/Listen properly.
Take it slowly and make sure to learn tagging and everything else that you come across!
I've put all of my years of experience into it, you can't learn several years of knowledge in just a second. It's like learning coding, but easier.
This is not a quick guide in any way just so we are clear. The Guide video alone is TWO HOURS!!
Got all of that ? Let's get started then!
As a lot of people have asked me for it, here is the Guide in a video format.
It's pretty much the same as the written version, so choose which one you want.
Link to the Video Guide:
(Warning: The video loads for me only with a VPN, so in case it doesn't load for you, there is your solution. Don't ask me why it's like that, I don't know either...)
Since Youtube doesn't let me put any Links in the description, you'll need take all of the needed Links from here:
Google Colab by Hollowstrawberry:
https://colab.research.google.com/github/hollowstrawberry/kohya-colab/blob/main/Dataset_Maker.ipynb
Here is the link to your Google Drive in case you've never visited it:
https://drive.google.com/drive/my-drive
Full Tagging Course: (Install "Google Doc Dark Mode" Extension, if it's too bright for you!)
https://docs.google.com/document/d/1NdA9kzmiMTDOfL3e36T0nTX4c93PJ99fXFNPXDuSmRw/edit?usp=sharing
"Lightshot" program for Screenshotting if you don't have any software for Screenshots:
https://app.prntscr.com/en/index.html
LoRA Guide Start:
Levels and Categories:
Use Table of Contents on the Right part of your screen if you are looking for a specific part.
Beginner Level:
If you want a quick and simple LoRA, this level is for you!
1) Making a Dataset
2) How to use the Google Colab by Hollowstrawberry
3) Making your first LoRA
4) Testing your first LoRA
Intermediate Level:
Time to learn how to use the Google Colab to it's full potential!
1) Full Tagging Course (Get ready, this is the longest section...)
2) How to sort/tag your Dataset with Multiple Outfits
3) Tagging the outfits in the Google Colab.
4) Training Settings
5) Outfit Variation LoRA
6) Non-Human Character LoRA
7.1) Concept/Pose LoRA
7.2) Quick Style LoRA (Not to be confused with those 200+ MBs LoRA)
7.3) Clothing LoRA
8) Quick Re-train of your LoRA in case of a failure.
Advanced Level:
Welcome to Hell.
1) Multi-Character LoRA
2) 10+ Outfits LoRA
Beginner Level
1) Making a Dataset
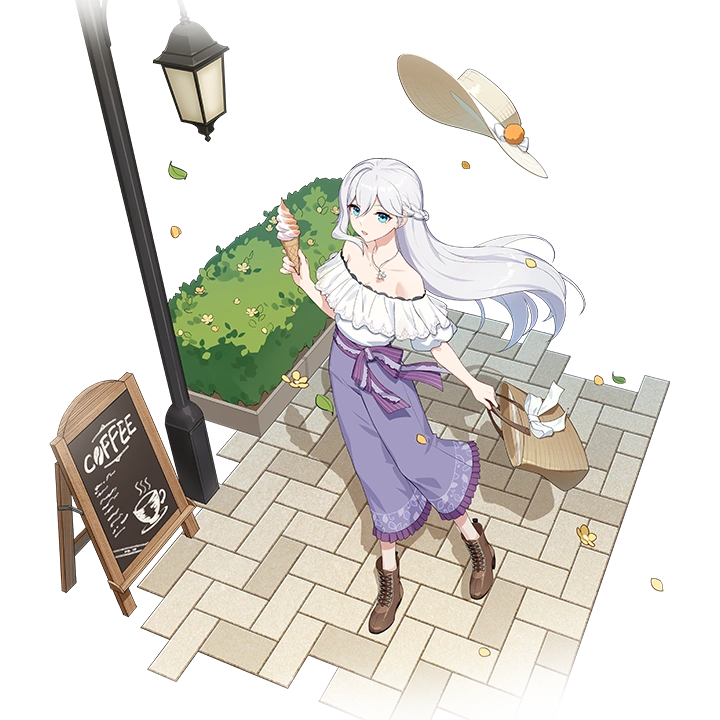
Let's get this finally started. We will be training on Songque's Default Outfit!
Recommendation: Install a screenshot Software like Lightshot: https://app.prntscr.com/en/index.html
There are 4 Main Sources of Images.
Booru Websites (Specifically Danbooru: https://danbooru.donmai.us/)
3D Model/MMDs
Google Searching
Copy/Pasting + Screenshot Cropping
Image Requirements:
Total of 20 Images. That is the hard minimum.
(Don't worry if you have only a single image, just use 4th Source of Images)
We can go up to 30 Images for Enhancement.
(Specifically if the outfit has some detail, which is missing in most images.
Example: Mask/Eyewear/Accessory)
And then of course 50 images, but this only used for a Beginner Level LoRA where you want
as many details as possible, Any images work here pretty much.
Before we look through our Image Sources, let's talk about
Image Priority.
Image Priority
Colors indicate the Priority.
Green is for "full body" images, they are the best images as they have every detail + footwear.
Yellow is for "almost full body" images, only footwear is missing pretty much.
Orange is for "cowboy shot" images, make sure if legwear is present it is still in the image!
Red is for "upper body" images, if possible, don't use these. Any legwear/"waistwear" is not shown
Maroon is for "portrait" images, don't use these. Just NO. It's fine only in 50 images variation.
"Backview" Images are Optional. You can include a few, but because most of the time
we look at the outfit from the front or from side, try to keep it to that.
Remember we are training outfits here, not styles or in a lot of cases not even eyes.
And since outfits are our priority remember this: Outfit Clarity over Higher Resolution.
I'd rather have slightly lower res on a full body image than cowboy shot with 4k x 4k resolution.
Different Image Resolution Ratios are fine by the way, The Colab will take care of any differences.

Image Source Number 1: Booru Websites.
Self explanatory, just google your character's name with "danbooru".
Also important note:
If you use this method, don't forget that you are 100% stealing artworks
from actual Artists. Keep that in mind and to clarify I am not stopping you
and I use it myself as I am no saint. But it's important to at least be aware of your
own actions.

Your character doesn't have a Danbooru page ? Or there are barely any images ?
Go to the next Sources then!
While we are here, a quick example of an image we can use, but will have to edit.
It's an official artwork (Try to use those if possible) with 2 characters.
In this case we don't need Serapeum, so we'll blur her out in an editing software like Paint.
After blurring and taking a screenshot. (Green frame is the screenshot's borders.)

Image Source Number 2: 3D Model / MMD
Your character is from a game or is a vtuber with a 3D Model ?
Great! Let's get start taking some screenshots then!
If it's a character you can view in-game and you have the game downloaded,
just find some in-game viewer or just take screenshots during gameplay.
Don't have the game downloaded ? Simply find a gameplay/showcase video of the character!
In my case here, Songque does have an in-game viewer,
so I can take screenshots of her there.

As for MMD, same as last time I will always recommend Akashi's Channel:
https://www.youtube.com/@Akashi1939/featured
Here you'll find a variety of MMDs for all sort of characters (mostly Gacha Games of course)
Just simply take any video with decent shading (Not too bright/Not too dark)
and take a few screenshots of it while having the Quality on at least 1080p, 2k if possible.
Slow the videos' speed down, if the dance is too quick to get good screenshots!

Image Source Number 3: Google Search
Once again pretty self explanatory, just google your character and see what you can find.
There are so many websites where people post images it's absurd.
From wiki pages, youtube, reddit, zerochan to printerest, facebook, instagram and more.
So just have a look around!

Image Source Number 4: Copy/Paste + Screenshot Cropping
In itself it's rather simple, you have a good image ? Copy/paste it or screenshot it.
Nothing complicated, but it works way too well.
I always use this method even if I have enough images with first 3 Source, because:
1 Good Image Copied 5 Times > 5 Decent Images
1 Decent Image Copied 5 Times > 5-10 Bad Images.
In this case the Image Priority still stands, but try to keep it just to Green and Yellow outlines.
Why make inferior images when you have a perfect image anyways ?

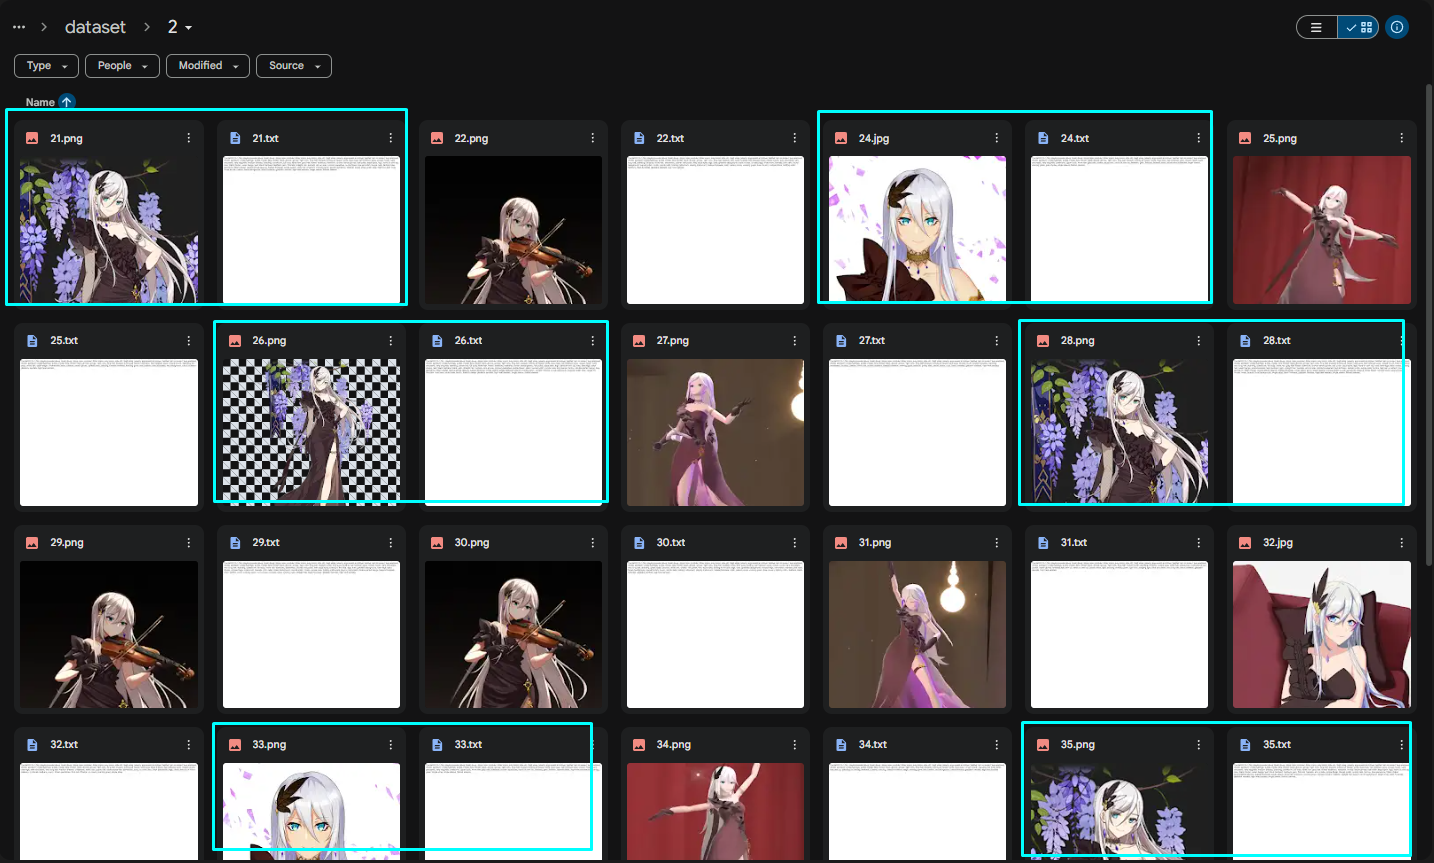
And with that here is the final Dataset for the Beginner Level, that I will be working with:

As you can see I've decided to use mostly in-game screenshots and official artworks.
Then copied a few official images to avoid style burn in and that's it, 20 images done.
Make sure you number all of your images from 1 to 20 and higher. (1-100 etc.)
Ensure that your images are either in .png / .jpg / .jpeg formats! No .webp or .jifi!
If everything went fine, you should have a dataset by now. The way we collected a dataset here will be the same for Intermediate and Advanced Levels!
2) Learning Google Colab by Hollowstrawberry.
Fun fact: It got a UI update just as I started making this Guide, so nice timing!
Here is the link to it again just in case: https://colab.research.google.com/github/hollowstrawberry/kohya-colab/blob/main/Dataset_Maker.ipynb
1st Step) Naming Project Folder.
Create a Google Drive Folder in the (1) Setup Section by giving your LoRA a name
and writing it in the "Project_Name" field. In my case it's "Songque_Hi3_IL".
You can name it whatever you want, but I prefer this way:
Name of the character - Name of the Game/Franchise - Model (Illustrious in this case)

2nd Step) Accepting Google Stuff and Creating our Folder.
Now click the "Start button" to Run this Section and accept all of the stuff Google throws at you.


If your Google is linked to your phone, you'll probably get a Notification about you connecting your Google Drive to this Google Colab. No worries though I get 20 of those messages per day when training LoRAs.
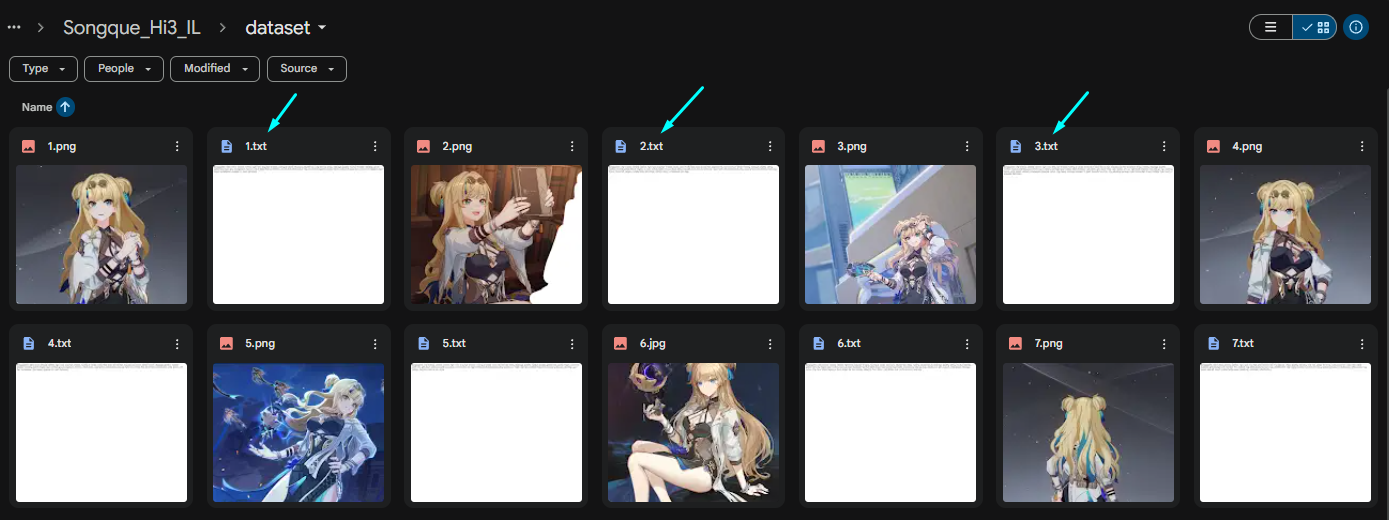
3rd Step) Uploading our Dataset.
Now that we have successfully created a folder in our Google Drive, let's open it.
Head to your Google Drive and you'll find a new Folder on it called: "LoRAs".
In the "LoRAs" folder find your LoRA Folder (Same name as the one you wrote, obviously).

In your LoRA folder, find "Dataset" Folder and open it.

And now upload all of your images to the "Dataset" folder.

4th Step) Launching Ai Auto-tag.
Head back to the Google Colab Dataset Maker.
Scroll past 2nd and 3rd Sections as they are useless to us.

Now Stop at 4th Section named "Tag Your Images".
Just click start on it and wait for AI to finish Auto-Tagging our Images.
While you wait check out 5th Step.

5th Step) GPU/CPU Usage + Managing Sessions.
Since we are waiting for Ai to Auto-tag the image.
Let's talk about Google Colab GPU Usage Time and how to preserve it.
Usually we get around 4-5 Hours of it every 2 Days or so.
In your Top Right corner of the Google Colab, you'll see a Checkmark with RAM/Disk charts.
Click on it and you'll see how many Hours you still have on your GPU.

We use GPU time for Ai Auto-tagging and LoRA Training.
For Multi-Outfit tagging and so on we'll be switching to CPU to save some GPU Time.
1 Hour of GPU time = 20 Hours of CPU Time after all.
Since we won't be tagging anything in the beginner level, I'll just explain how to
Switch Runtime and End the Session after you are done in the Dataset Maker.
Click on the little arrow near the charts and then click Change Runtime Type.

Though we won't be changing right now, but in the window that popped up you'll need to choose CPU and then accept another pop up prompt and click save.
No need to actually follow this step, it's needed for the future. So just remember it.

Now let's see how we end the session.
Again this is so you know how to, don't actually end it while AI is still auto-tagging!
You will do this when you are done with either the Dataset Maker or the LoRA Trainer.
Click "Manage Sessions", in the window that popped up, then press the "Trachcan",
And lastly click the "Terminate" button.
Again just for your knowledge, don't terminate it right now...

6th Step) Checking your Tags and new .txt Files.
Your Ai Auto-tagging should be almost done by now, if not wait a bit until you see AI
give the "Tagging Complete" and here are your TOP 50 Tags.
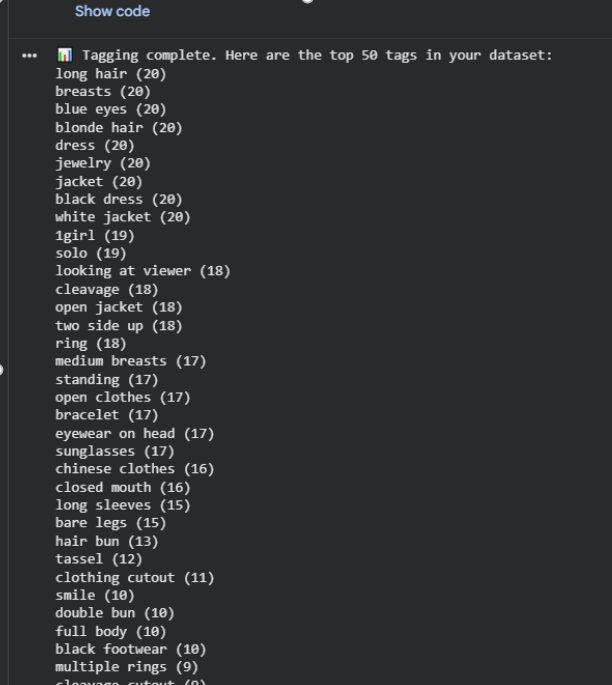
Feel free to browse the tags here if you want to.
Now let's quickly check our Google Drive and we'll see that we got new .txt files in it.
These are your Tags for each Image.
The numbers of course correspond to which image the tags are for.
Now let's add some tags to these .txt files!
7th Step) Adding the Global Activation Tag
Scroll a bit down over to 5th Section "Curate Your Tags" and
assign a Global Activation Tag for your LoRA.
Write it in the "global_activation_tag" line.

I personally prefer either full or shortened name of the Character + Short version of their
Game/Franchise. But once again you can name it as anything you want except actual tags like "dress, shirt, 1girl, etc."
8th Step) Looking through your Tags.
Now I did say that we won't be tagging anything in the Beginner Level, but I will show you
how the 5th Section works as it will be needed for the Intermediate Level.
But before that let's scroll down to Extras Section below and arrive at "Analyze Tags".
Change the number in the line from 50 to 75 and run this Section.

After it finishes you'll get a similar column of tags as you've seen after Auto-tagging was complete.
We use this part to see more tags and check if we need to remove anything.
Speaking of which.
9th Step) Removing Tags.
Let's remove some tags. Choose any tag like "simple background" or something irrelevant.
Now go back to 5th Section Curate Your Tags and write it in the "remove_tags" line and run it.
Make sure your Global Activation tag is always present!

10th Step) Adding Tags to the Entire Dataset
Now let's learn how to add tags to the entire Dataset.
For example in my case I'm going to add "chinese clothes, china dress" to the Front of the tags.
Scroll slightly down in the 5th Section and find "search_tags" and "replace_with"
Write your global activation tag in the "search_tags".
Write the tags you want to add in the "replace_with".
Since I want them to be at the front near our Global activation tag, I will checkmark
the "new_becomes_activation_tag". If you don't click on it, it will be at the end of your tags.
And of course Run the Section after you have written everything you need.

11th Step) Adding Tags to Specific .txt Files
Let's assume I want to add additional tags to a specific tag, which doesn't appear in every image.
Like "ankle strap" for example, it's close to footwear, so we can use that as the indicator.
Now important: The top tags in this case will be replaced, so you have to add them at the bottom as well to keep them!
Now all 3 Tags will be added at the end of any .txt file, which had "black footwear, high heels".

3) Making your first LoRA
End the Dataset Maker Session as it was shown in the 5th Step.
1st Step) Opening LoRA Trainer.
And scroll all the way to the top.
Then click on the XL LoRA Trainer -> Open in Colab.

2nd Step) Name + Model
Write the name of your model in the "project_name" line.
You can change the "training_model" if you wish to,
but I'm going to be training with IllustriousXL v0.1

3rd Step) Training Parameters and Starting the Trainer.
Scroll down until you see "activation_tags" and "num_repeats".
No need to touch the amount of Activation tags, just make sure you know where
they are. We will be changing them in the Intermediate Level.
As for Number of Repeats here is how it goes.
For 20 Images => 20 Repeats
For 30 Images => 14 Repeats
For 50 Images => 8 Repeats.
In my case I have 20 images, so I will write 20 Repeats.

4th Step) Epochs Explanation and Stopping the Trainer.
Feel free to start the entire Section, then accept the Google's stuff and let AI download everything it needs and proceeds to the training itself.
The training should take roughly 30-45m.
While it's doing that let me quickly explain when we will stop the training and
Why we stop it specifically at 3rd Epoch.
Fair warning this part might be controversial as not everyone agrees with it, but
that's how I do it.
You'll know AI has started training when the "Epoch 1/10" has appeared.
After some time it will get to "Epoch 3/10", we wait until it's finished and "Epoch 4/10" starts training. This is when we Terminate the Session as we did before in the top right corner.
of the Google Colab.

So why do we stop it here ? It's only 30% done after all.
To those unaware Epochs are like Versions of the LoRA. They go from 1st to 10th by default.
In order to explain this properly let's look at this image I've made.
(Drawn by hand take it with a grain of salt)
The Lines represent the clarity of the generated image with the LoRA we made.
1st Epoch is always a warm-up so it will have practically nothing related to the character.
So obviously it's not what we use.
2nd Epoch is starting to look better, but it still inferior to any of the next Epochs.
3rd Epoch is going to be pretty much perfect, which is why we can already use it.
So what's the difference between 3rd, 4th, 5th, etc, 10th.
5th Epoch will be a slightly better version, which we will always take over 3rd, but it will require more time. And the quality increase is of course extremely small.
10th Epoch is finally the sharpest of them all! Obviously it's the highest quality, right ?

Well now let's face the reality of things, this entire image has been viewed under
a microscope.
This is the actual difference between every Epoch.
I'm sure people with big egos will still say, there is still a massive difference, I can see it!
Well maybe you can see it. 99% of people and me included can not see it, I guess you are special.

This entire Step leads to just one important question.
If 10th Epoch is still slightly Better than 3rd, why not train until 10th Epoch ?
The answer is: Time.
Remember how I said that we get a limited amount of GPU Usage Time ?
Yeah it's 4-5 Hours every 2 days.
Well let's check how many hours it takes to train with multiple Outfits.
Training time for 3rd Epoch:
1-2 Outfits => 30-45m
3-5 Outfits => 1h to 1.5h
6-8 Outfits => 2h to 3h
9-10 Outfits => 3h to 4h
Training time for 10th Epoch:
1-2 Outfits => 2h+
3-5 Outfits => 3-4h+
6-8 Outfits => 5-6h+
9-10 Outfits => 7-8h+
Remind me how many FREE GPU Usage Time we get ?
Oh Yeah FOUR TO FIVE HOURS.
Why in the heck would anyone train for 4 hours for a 5-Outfit LoRA, when you could've made around 3 same LoRAs with that time in the single day and the Quality would be practically the same ???
Sorry if it sounded like a rant, but I want to make this position very clear.
Let's go get our LoRA Now.
4) Testing your First LoRA
I would assume that you have already terminated your LoRA Trainer at 3rd Epoch, so
let's move to the Google Drive.
1st Step) Open back the LoRA Folder
In your LoRA folder we now got a few new things.
First and foremost the Output Folder. Our LoRA is of course there.

Before we go and download it, let me quickly explain everything else that has changed.
There is now a dataset_config and a training_config
Both are not interesting to us right now, but dataset_config will be used in Intermediate Level when we re-train.
Dataset Folder got new files: .npz If you decide to change the tags in your LoRA, delete all of these first. These files are basically Image+Txt and are only used during training.
2nd Step) Download the LoRA
Open your Output Folder.
You'll see 3 or more files (If you forgot to stop at 3rd Epoch that is)
Just download the 3rd or the last one. Every previous file can be deleted to save space.

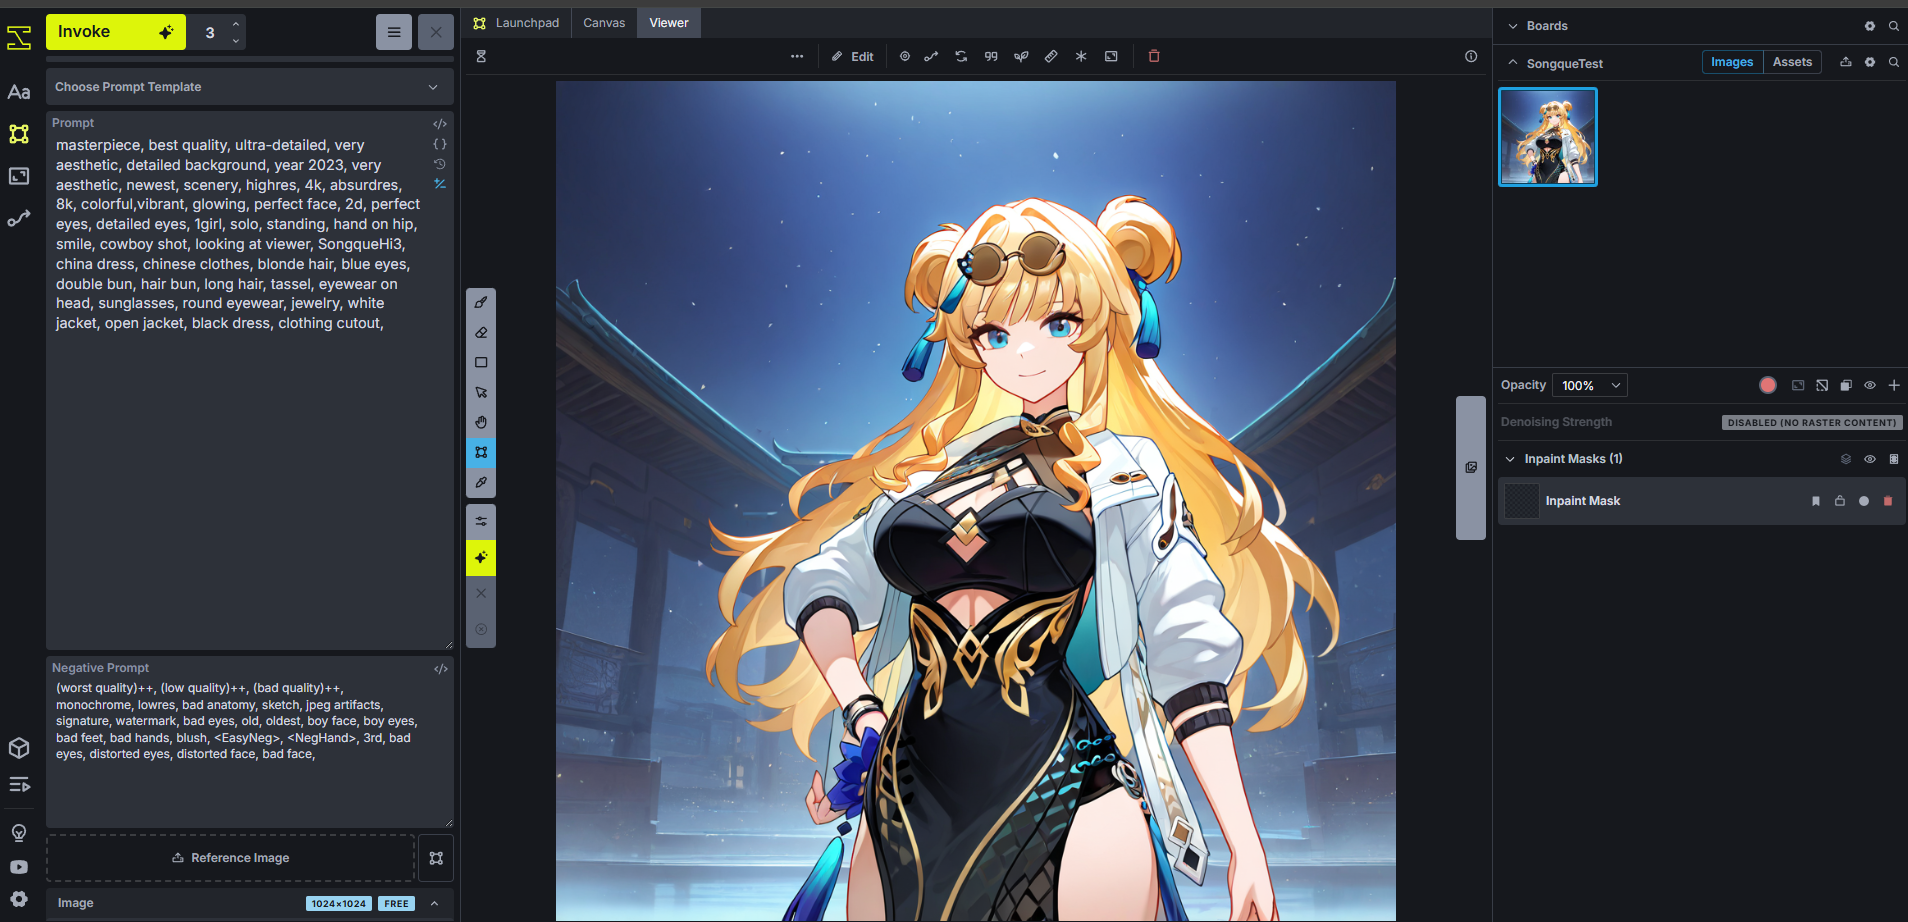
3rd Step) Generating the First Image.
Now here you'll have to upload your LoRA either into your Image Generating Program or
on a website like CivitAi.com or Tensor.Art to test it.
In my case I generate locally using InvokeAI (I will be making a guide on it at a later date).
For the prompt, go to any of the .txt files in your Dataset folder and look through it.
Since we didn't tag it ourselves we'll have to check what AI has auto-tagged for us and pick what fits for the character. Just look for the basic tags like "blonde hair, long hair, blue eyes" for the character and "dress, black dress, jacket, sunglasses" for clothing.
And of course don't forget to include your Activation tag!
In my case Ai gave me these for Songque:
(I did add "china dress, chinese clothes" if you remember)
"SongqueHi3, china dress, chinese clothes, blonde hair, blue eyes, double bun, hair bun, long hair, tassel, eyewear on head, sunglasses, round eyewear, jewelry, white jacket, open jacket, black dress, clothing cutout,"
4th Step) Checking the Images.
If everything is okay, you should be satisfied with your LoRA.
Of course in my case the Outfit is rather simple, so Ai didn't have any issues with it.
But sadly Ai has no idea how the outfit is structured as we didn't tag anything properly.
But overall anything will good when it's Single Outfit LoRA and we give Ai 20 Repeats on 20 Images, that's 400 steps for a Single Outfit... With multiple outfits we won't have luxury, so we'll have to tag everything properly, so Ai doesn't train on some weird tags, which shouldn't be there in the first place.
So without further ado...
Time for Intermediate Level!
Intermediate Level
1) Full Tagging Course
If you are not watching the video this part might be slightly confusing as I'm just giving you this
Google Doc and telling you to study it by yourself...
https://docs.google.com/document/d/1NdA9kzmiMTDOfL3e36T0nTX4c93PJ99fXFNPXDuSmRw/edit?usp=sharing
Reminder: Download "Google Doc Dark Mode" if it's too bright for you!
Yep that's it, good luck, almost everything you need is in there. Explanations, Tips, Notes, Etc.
Don't comeback here until you know most of the Archetypes at least.
And also an important Disclaimer:
Regardless of how good you are at Multi-Outfit LoRAs, Single Outfit LoRA will always beat a Multi-Outfit LoRA if we are comparing a single Outfit. That's just how it works like it or not.
I'm making Multi-Outfit LoRAs so people can enjoy a variety of outfits without the need to download 200 LoRAs with each weighting around 50MBs, that would be absurd.
2) How to sort/tag your Dataset with Multiple Outfits
The Model for our Intermediate level is going to be Cecilia Shariac from Honkai Impact 3rd.
Fun fact and a spoiler: In the previous version of this guide I made a LoRA with Durandal, who is Cecilia's daughter, quite an interesting coincidence. Cecilia was requested, so that's why we are making her a LoRA.
Now I've explained mostly how I tag images in the Guide Video and I'd rather not go over how I do in text at this point as it's really not that hard when you know your tags.
After last guide version I've learnt that in most cases people just don't know the tags. It's not about how to tag. So here are all of the tags I will be using for Cecilia's Outfits, I hope it teaches you how it usually goes.
In total 8 Outfits, 20 images each, so 160 images.

The links to all of the datasets used in this guide are going to be at the bottom.
Let's start tagging and don't forget, no Same Tags in Different Outfits!
First tag is always the Activation Tag for the outfit, don't confuse it with Global Activation Tag.
So assign whatever you want, I usually shorten character name and add 2-4 letters related to the outfit. Example: Swimsuit -> Swm.
So Activation tag for Cecilia here would look like this: Ccl_Swm,
In general for Tagging I use a simple Text Document. You can use Google Doc, Word or something else if you wish to.
1st Outfit: (Default)
Ccl_Def, black unitard, unitard, sleeveless unitard, yellow trim, yellow belt, belt, short shorts, black shorts, covered navel, crystal earrings, collared capelet, black capelet, shoulder cutout, high collar, cleavage cutout, two-sided fabric, black armband, black gloves, half gloves, black wrist cuffs, hair ornament, black hair ornament, white thighhighs, thighighs under boots, black footwear, joints, thigh boots,

2nd Outfit: (Formal Dress - Stigmata)
Ccl_Drs, single-shoulder dress, black dress, single bare shoulder, frilled dress, long dress, side slit, thigh strap, jewelry, asymmetrical clothes, feather hair ornament, lace armband, choker pendant, crystal earrings, purple crystal, lace choker, black gloves, gloves,
,single sleeve, fishnet sleeves,
black footwear, gladiator sandals, high heel sandals,
If your outfit has some details, which are not present in every image like footwear, just write them on the side, we'll be adding them separately.
(In this case it was footwear and her single sleeve)

3rd Outfit: (Pale Moon Outfit - Stigmata)
Ccl_Str, small ponytail, feather boa, shawl, sleeveless dress, white dress, black shirt, shirt under dress, bare shoulders, necklace, blue gemstone, yellow bow, thigh bow, yellow underbust, yellow ribbon, two-sided skirt, high-low skirt, hair ornament, blue hair ornament, star earrings, erescent earrings, mismatched earrings, emblem,
white flats, flats, footwear bow,

4th Outfit: (Swimsuit Outfit)
Ccl_Swm, white bikini, string bikini, pendant, pearl trim, single off shoulder, white jacket, see-through jacket, off-shoulder jacket, side-tie bikini bottom, midriff, navel, straw hat, hat ribbon, white ribbon, bracelet,
anklet, barefoot,

5th Outfit: (Wedding Outfit)
Ccl_Wed, wedding dress, off-shoulder dress, frills, blue rose, blue flower, flower hair ornament, high-low dress, pearl (gemstone), pearl necklace, bare shoulders, large bow, dress bow, short sleeves, frilled sleeves,
pearl anklet, white footwear, high heels,

6th Outfit: (Alt Story In-game Outfit)
Ccl_Alt, print shirt, floral print, white shirt, juliet sleeves, white sleeves, black ribbon, black bow, neck ribbon, bowtie, sleeve garter, gold trim, heart (symbol), black corset, layered skirt, waist bow, light blue gemstone, frilled collar, black skirt, long skirt, skirt under skirt, white skirt, thighlet, skirt,
gold ribbon,
o-ring anklet, gold colored shoe sole, strappy heels, white high heels, single kneehigh, white kneehighs,
Sadly, I barely had any in-game screenshots, which could work for this Outfit.
Most images came from MMDs, which were slightly altered in the final model.
Not to mention the design has a weird placement of "spaghetti strap, clothing cutout" near her Collarbone. That part has sadly failed during training.

7th Outfit: (Casual Attire - Stigmata)
Ccl_Cas, off-shoulder shirt, white frilled shirt, frilled shirt, puffy short sleeves, pendant, half up braid, purple bow, purple belt, belt bow, light purple pants, pants, bell-bottoms,
bag, light brown bag,
sun hat, light brown headwear, unworn hat, hat bow,
cross-laced boots, brown footwear,
8th Outfit: (Rockstar/Idol - Stigmata)
Ccl_Mus, white crop top, crop top, cleavage, criss-cross halter, cropped jacket, black jacket, open jacket, sleeveless jacket, detached sleeves, black sleeves, blue sleeve cuffs, sleeves past elbows, black choker, belt choker, midriff, navel, denim shorts, black shorts, white belt, loose belt, black thigh belt,
zipper footwear, ankle boots, white boots, orange ribbon, ankle ribbon,
I hope whatever Outfits you need to tag are not very complicated and they don't have too many
similar tags. But regardless, good luck with this part!
3) Tagging the Outfits in the Google Colab
Now that we have tagged our images, let's do quickly run through the same things we did in the Beginner Level.
1st Step) Getting the Dataset Tagged.
Create a Folder in the Dataset Maker in my case it's: Cecilia_Hi3_IL

Upload all of your Images into the Dataset Folder
And go to 4th Section to let Ai Auto-tag your images, you'll get a lot of tags this time as we do have 160 images.
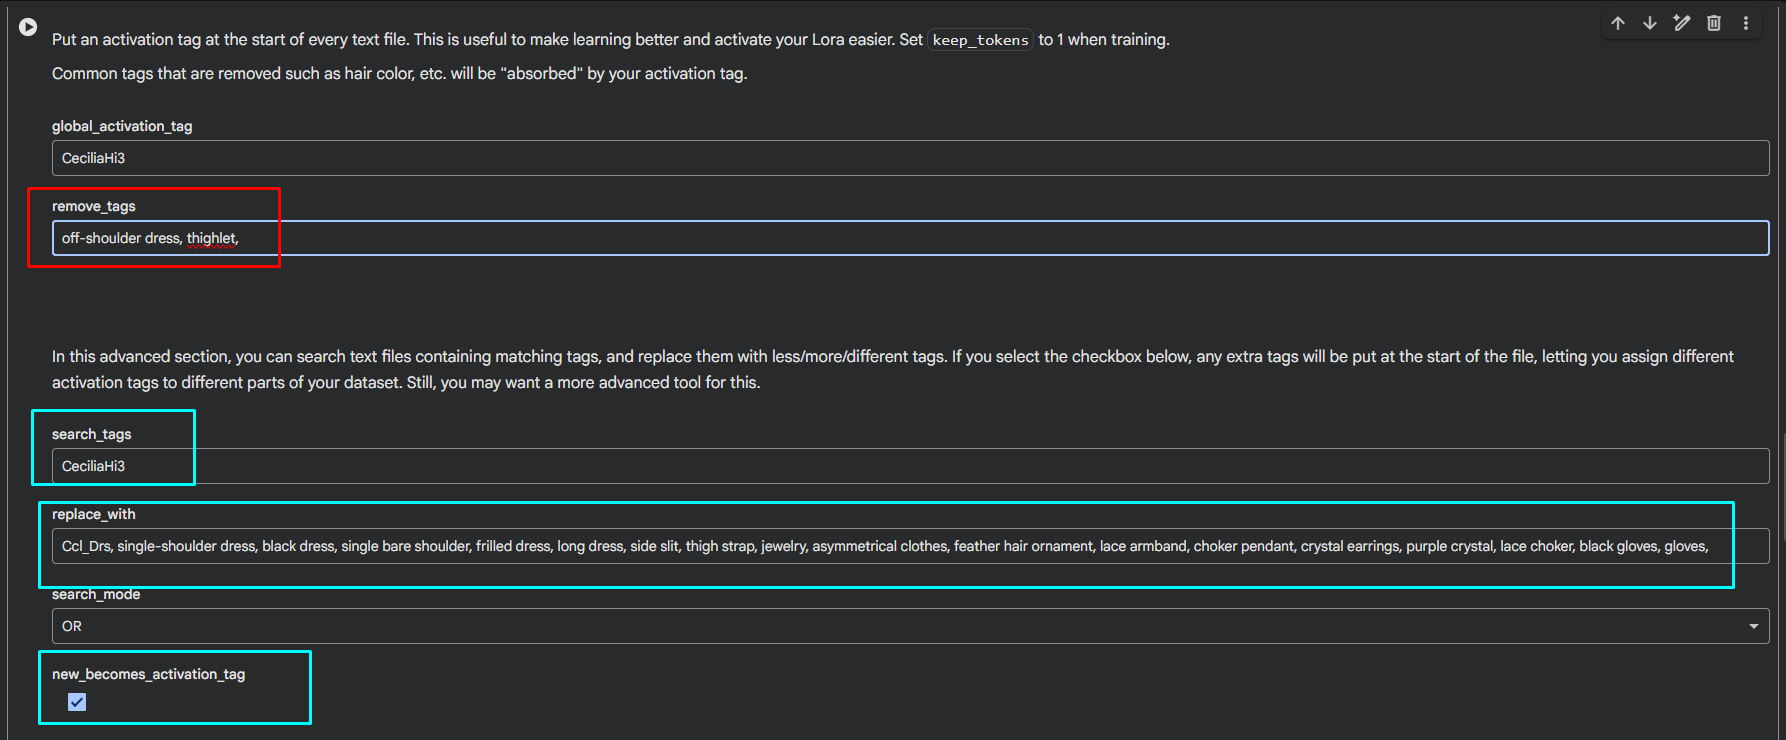
Go to 5th Section and assign a Global Activation Tag. It's "CeciliaHi3" in my case.
2nd Step) Removing Unnecessary Tags.
If you have actually went through the Full Tagging Course, you would know that now
we need to remove any useless tags such as "dress, shirt, shorts, gloves, etc."
Don't remove Footwear related tags though.
We need them to assign footwear properly later.
Also Ai will tag some tags properly, but we also have to remove them as they might be in several outfits and that won't do.
So if you see any "black gloves, sleeveless dress, off-shoulder shirt, strapless dress, etc."
Remove such tags as well.
Backgrounds are no strangers here either, get rid of them.
"simple background, grey background, black background"
I remove most of these tags by memory, but if you are not sure what tags there are, just simply head to Extras and in the Analyze Tags set the "show_top_tags" to 200 and run it.
That way you'll see a lot of the tags your dataset has, you can remove them now.
Don't worry if you've missed any we'll remove them later.
Here is how it looked for me in the end:

(Just an example though, I've done this several days ago as if I remember every tag I've removed...)
3rd Step) Sorting Images
Now that we've removed those tags, let's change the Runtime from GPU to CPU.
You of course should know how to do that by now from Beginner Level.
Head to your Dataset Folder and Create several Folders. Name them 1, 2, 3, etc.
Example: If you have 5 Outfits, make 5 Folders.
I have 8 Outfits so I will make 8 Folders.
Then choose the images and put them in the respective folders.
1st Outfit into 1st Folder.
2nd Outfit into 2nd Folder.
And so on.

!Now Warning!
If you accidently created an "untitled folder" or a folder with a wrong name.
NEVER rename it. Google Colab will not be able to see it.
Always delete such folders and create new ones with the correct names.
So general Rule: Never Rename Folders.
4th Step) Finally tagging your first Outfit in the Colab
Got your images sorts into folders ? Great. Let's go back to Dataset Maker.
In the first Section you will now right not just the name of the LoRA we are working on, but
also the name of the Outfit Folder. In our case it's just numbers, so that's what we will write after a slash /
If it's 2nd Folder it of course would /2, for 3rd it's /3 and so on.

You'll have to accept Google Stuff again since after switching Runtimes we fully disconnect from the Google Drive.
Oh and one small thing, don't move files/images from the connected Folder. Either Terminate the Session or how we did it, Change Runtime. Then move them.
Move down to Extras and Analyze Tags, input 75 this time and run it.
You'll again see the tags, but just for this specific 1st Folder.
Check if any tags are still unnecessary and need to be removed.
The move back up to the 5th Section "Curate Your Tags"
And let's add some tags.
Remember how we tagged our Outfits with an outfit Activation Tag ?
Yeah so anytime you are applying that make sure your "new_becomes_activation_tag" is
check-marked, otherwise don't checkmark it as it will screw everything.
Now put all of the Tags for your First Outfit into the "replace_with" and your Global Activation Tag into "search_tags". And checkmark at the end of course. Run it.

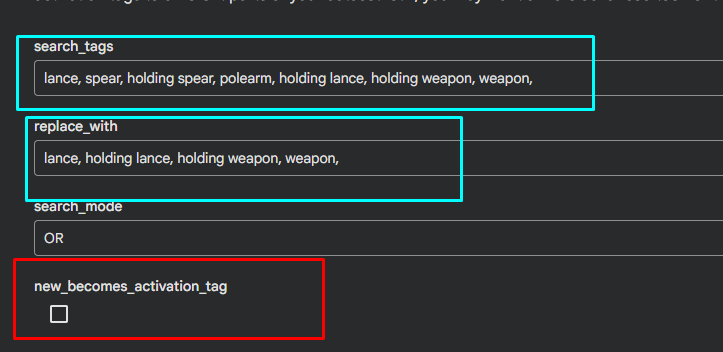
Now let's add her weapon as she has it in the first outfit. Since it's not in every image and we don't want to replace our outfit Activation Tag, we'll remove the checkmark.
Footwear will be the same by the way.
We won't need to use Global Activation Tag in the "search_tags" in this situation.
Though I did cover this in the Beginner Level, let's make sure it's properly put into your head.
As you can see in the "search_tags" I've put all of the tags AI thought her weapon was.
I know it's a lance, so I will make AI search for all of these tags, but only leave these Lance/Weapon related tags.
5th Step) Rinse and Repeat
Now that we've tagged our first outfit, let's go back up to the 1st Section "Setup" and
change the Folder number to "/2". Run it.

We are now in the 2nd folder, no google stuff this time since we have already connected to our Google Drive, so we can just hope between Folders with ease.
Scroll back down to Extras and Analyze Tags, check your tags see if Ai gave any suggestions or if it gave anything stupid, remove it.
By the way you can Remove tags and Add them at the same time.
Copy/paste your tags and let's run it.
Let's add her footwear now.
Similar to adding weapons, add footwear tags you made, then add basic ones we didn't remove like "shoes, boots, black footwear, white footwear, high heels, sandals, etc." to the
"search_tags" line. And run it with your correct tags in the "replace_with" line.
No Checkmark of course.

If your outfits don't have the issue explained in the 6th Step, then just go back to 1st Section "Setup" and keep doing the same process for every Outfit you have until you got all of them.
6th Step) Abnormal/Manual Tagging
Now remember how the Cecilia's outfit with black dress had a "fishnet sleeves, single sleeve" ?
As we are not sure if Ai auto-tagged it in every single image, let's add it manually.
Go to your Dataset Folder on the Google Drive and search for images with the specific concept you want.
In my case it's going to be these several images + .txt files.
Now click on the dots on the .txt file of your choosing.
And then select "open with", followed by "Text Editor"
Tip: CTRL + Left Mouse Click will when click on "Text Editor" will open it without switching you out of the dataset tab, so you can quickly choose all of the .txt files which you want.

Then simply input the tags you want and click "Save to Drive".
Don't forget to add a Comma after the last tag, it's usually not there!

You can close the tabs now that you have added your tags.
I would assume that you have already tagged all of your images, so let's go train the LoRA!
4) Training Settings
Terminate the session of your Dataset Maker if you haven't done so yet and go to the
LoRA Trainer.
Put the name of your LoRA into "project name" as per usual and scroll down to
"activation_tags" and "num_repeats"
For Activation tags we now have 2 of them, so go ahead and change 1 to 2.
As for Repeats line ignore as we got a more interesting one.
Scroll Down to Extras.
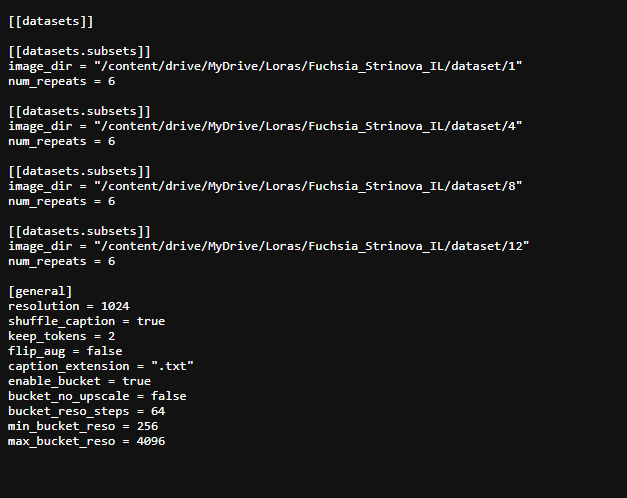
Multiple Folders in a Dataset
Alright this Section may look confusing but it's quite simple.
We just need to change a few words/numbers.
Tip: Double click on what you want to change for it to get highlighted so it's easier to remove!
Change "Example" to the name of your LoRA. "Cecilia_Hi3_IL" in my case.
Change "good_images" and "normal_images" to the names of your folders, so 1, 2, 3, etc.
Change "num_repeats" to 10.
And then copy the blocks until you have enough for every Outfit Folder.
So this:

Becomes this:

Then simply run this Section and after GPU Runtime has been connected, run the LoRA
Trainer and wait until the 3rd Epoch as per usual.
Here is a quick reminder on how long it should take:
Training time for 3rd Epoch:
1-2 Outfits => 30-45m
3-5 Outfits => 1h to 1.5h
6-8 Outfits => 2h to 3h
9-10 Outfits => 3h to 4h
While that's training let's go and explore some other LoRA Variations, shall we ?
Most of these "weird" LoRAs are just quick explanations with tips.
They are trained in the same way as either a Single Outfit LoRA like in the Beginner Lever, but with proper tagging or Multi-Outfit LoRA, which we've have just started training.
5) Outfit Variation LoRA
This LoRA explores 2 Scenarios:
A LoRA with a Single Outfit, which has multiple Variations. It can be a mask/eyewear or completely different outfit structure.
A LoRA with multiple outfits, but a few outfits, which need extra images for enhancing mask/eyewear/etc. Basically going for 30 images instead of 20.
1st Scenario) Vita: Lone Planetfarer Outfit
This LoRA of mine had 3 Variations
1) Just the Outfit, no Modifications. Main Goal was to get better clarify and
try to get her "legwear garter" to work. Sadly the results weren't perfect, but it's not my fault that Vita is a woman, which loves to tortu-*%& is a beautiful woman.
2) Was for the Mask. As sadly it didn't want to work in a single folder, I had to go with an additional folder just for it with close up images of it.
3) The actual Outfit Variation: Them Pants. Instead of a "single pantsleg" there are actual "pants".
1st Folder was for images like this:

2nd Folder was for images like this:

3rd Folder was for images like this:

The entire thing is trained in the same way as regular Multi-Outfit LoRA
So 3 Folders, Activation Tags for each Folder, 20 images x Repeats and go train.
Nothing complicated and quite a rare LoRA to make anyways.
2nd Scenario) Extra Details + Enhancement - Raiden Mei (Herrscher of Origin)
In this case I had 5 Outfits.
Default Outfit
In-game Swimsuit Outfit
Merch Swimsuit Outfit
Teacher Outfit
Chinese Outfit
As I wanted to make sure that her Default Outfit and In-game Swimsuit Outfit had their Eyewear properly trained as no one has ever even tried to include them in a LoRA from what I've seen.
Well in order to train properly on these accessories I've added 10 extra images with said accessories to each folder, so final count was like this:
1st) 30 Images 2nd) 30 Images 3rd) 20 Images 4th) 20 Images 5th) 20 Images.
Here are the actual Accessories.
1st Outfit's Accessory: Mask.

2nd Outfit's Accessory: Sunglasses.

During the initial training I went for repeats with balanced approach:
30x7 / 30x7 / 20x10 / 20x10 / 20x10
So 210 / 210 / 200 / 200 / 200, but that has backfired and that was not enough repeats
for the 1st and 2nd outfits. Thus the correct solution is to balance it in total Steps instead of
individual.
30x10 / 30x10 / 20x10 / 20x10 / 20x10
With final count being 300 / 300 / 200 / 200 / 200
But since we had 200x3 on the other spectrum of the dataset (600 VS 600), the 1st and 2nd outfits did not bleed into other outfits. Obviously it's also thanks to proper tagging.
So if you decide to enhance your Outfits in Multi-Outfit LoRAs with 30 images, be careful with balance and try to give 10 repeats to those folders if possible.
Proper tagging is of course Mandatory.
6) Non-Human Character LoRA
Funnily enough it's not very Complicated and you should already more or less know the tags I usually use for such LoRAs, if you've went through the Full Tagging Course like you were supposed to.
But anyways in this Example, I will show you "How to train a dragon". (Okay I had to make the pun, alright ? I was too nervous to make it in the video...)
In this case the Dragon is Kurikara from Honkai Impact 3rd.
As you can see it's just 20 images, which I managed to scrape either from in-game or from images online. Barely anything to be fair, so had to accept and work with what I got.
The training process is the same as Single Outfit LoRA in the Beginner Level.
The biggest difference is the tagging as we let AI handle most of it.
We can add a few of our own of course. Make sure to always include "no humans" tag!
For example for Kurikara here I add these:
KurikaraHi3, no humans, dragon, red armor, armored dragon, armored wings, dragon wings, gold trim, talons, horns, dragon horns, claws, animal focus, monster, tail, mountains, grass, sun, clouds, wyvern,
After that I trained it and got this image with the trained LoRA.
Just don't forget to get rid of human related tags when you generate such images.
Like "1girl, 1boy, mature body, long hair, etc."
(Extremely raw image and Not inpainted so doesn't look as good as it can be of course)

7.1) Concept/Pose LoRA
Quite complicated, yet can be very simple.
For Poses:
You want a specific pose ? Shove 20 or 30 images into a folder of that pose,
tag it a bit, but mostly rely on Ai Auto-tag and don't forget Global Activation as per usual!
Same Process of training as a Single Outfit LoRA like in the Beginner Level.
For Concepts:
You want your character to look like Cubes ? Shove 20 or 30 images into a folder of the cube-form. I've made such LoRAs, you can find them on my CivitAi page.
Repeat the same steps as a regular single outfit LoRA.
Now let's say you want a weird concept and you want it to be flexible.
Here it's all going to be luck and what images you can get.
To clarify on what I'm talking.
Here is the dataset for a Concept of a Powershot from Inazuma Eleven Franchise.
(By the way fun fact I have been a fan of the series since I was like 11 I think.)

I felt quite skeptical about posting about it as it's not too great, but... Well umm Great enough for a comic, I've made, if you haven't read it yet go read it after the Guide!
Link: https://civitai-proxy.pages.dev/articles/21830
Sorry, but I did spend 6 months on it, so of course I'm going to promote it a few times...
Anyways back to the Concept.
General tagging was something like this:
HissatsuShot, kicking, magic, aura, glowing, soccer ball, telstar, magic ball, glowing ball,
I then also tagged every image with different elements. If it was a fire shot, I would add "fire ball" or "fire magic" and so on. That way it would be possible to switch elements while generating the images.
And then I trained it. Results speak for themselves if we look at a panel from the comic.
It's heavily Inpainted of course, but the effects/glowing of the ball are from the LoRA itself.

Text is made with Flux in case anybody was wondering.
7.2) Quick Style LoRA
As I've said in the beginning, not to be confused with 200+ MBs LoRAs you see everywhere.
This is trained mostly on 1-2 images of the same style.
Now to clarify, DO NOT request me to make or release any LoRAs made using this method
or Style LoRAs in general. Hi3 Pony Style LoRA was a One time exception.
This is plagiarism at it's full potential and I do not support releasing such LoRAs in public media spaces. Only use it for your own personal use, if you have at least some respect for
Artists, who actually work hard on their artworks.
Back to the LoRA now.
In my case I took an original character made by freeze (867139) and then screenshot cropped it to get 20 images, I also picked up the concept art for a bit of flexibility.
To clarify any images would work here, I just happened to have a full body image, which is perfect, you got some cowboy shot or even upper body ? It can still be trained if it's just for the style or character appearance.

In general this is the same as training a Single Outfit LoRA. Tag your character properly and train it. Here is the Result. Now if you want to use a Style LoRA by itself with the character from it, you may need to lower the weight to like 0.8 if you have barely any images to work with.

Now let's try to apply it to a different character LoRA. Remember that Songque LoRA I made?
Let's go add it, get it's tags and remove any tags related to this Style LoRA (Including the Global Activation Tag of it)
So the Style LoRA is at 1.0 weight and Songque is at 1.0 weight, but nothing related to Style LoRA is in the prompt.
Same Prompt for Both Images.
Just Songque LoRA _ _ _ _ _ _ _ _ _ _ _ _ _ _ _ _ _ _ _ _ _ _ Songque LoRA + Style LoRA

So what's the biggest difference between a Heavy Style (200+MBs) and this Quick Style (50MBs+)?
There is no big difference apart from weight and time used for training.
I called it Quick since it takes roughly 30-45m to train as any other single outfit LoRA.
Heavy LoRAs take several hours if I remember correctly.
The only issue is that some parts of characters' outfits may change.
Look at Songque's sleeves, they are now way bigger with the style LoRA.
So some parts might become a bit different from what you would except, but that's about it.
Once Again do not ask me to make Style LoRAs for you or public. I will not make them.
7.3) Clothing LoRA
Quite straightforward. We don't train on the character, we train on the clothing.
Meaning you can shove any character in the dataset you want as long as the outfit is the same.
In this case it's once again Inazuma Eleven. Just the Uniform of the Earth Eleven.
Tag the clothing, let Ai Auto-tag the characters' appearances. Go train as per usual.
The results can be found in my Comic of course, so go read it!

8) Quick Re-train of your LoRA in case of Failure.
By now I would assume your first Multi-Outfit LoRA has finished training and maybe you even tested it.
If not let's quickly test it. This time when you go to your .txt for tags you will just have to copy everything from the start until "1girl" tag + Footwear or other details that you have.

Let's see how Cecilia's LoRA has turned out.

Okay seems to be good.
Just minor tweaks here and there it's pretty much perfect.
Now here is the part where I want you to understand something.
If some parts of your Outfits didn't turn out great, don't panic and see if the issue is
consistent, so generate a few more images.
If the issue appears all the time when there are 2 options:
1) Identify what sort of issue it is. If it's something you can fix by simply removing tags related to the issue or simplifying some part of an outfit. Then congratulations you probably don't have to re-train your LoRA.
2) Welp if it's not 1st then of course it's 2nd, so time to re-tag some parts and re-train the LoRA...
Get back to the Dataset Maker and your Google Drive.
For this case let's assume every outfit is okay except 3rd outfit.
Go into the folder of your faulty Outfit or Outfits.
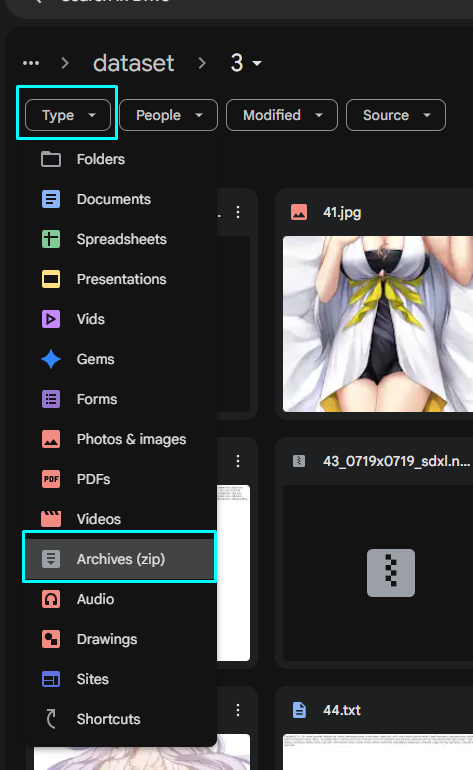
Under "dataset" click on "Type" and then click "Archives (zip)".
This will sort the files and only show you those .npz files. Delete all of them.

Now let's go to the Dataset Maker.
In the Setup write the name of your LoRA and the Outfit Folder,
so in my case: Cecilia_Hi3_IL/3
Before you run it though, as we won't need to Ai Auto-tag, go ahead and change the Runtime to CPU before you connect to the Google Drive.
Well I think you know what to do next, simply follow the same steps we did before when you were tagging the outfits.
You wanna replace "sleeveless dress" with idk "halter dress". Go ahead and do that then, same as replacing footwear or weapons. I seriously do not need to show this to you again...
Before you start training here are 2 things to do:
1) Delete all of the LoRA files from the Output Folder. I think this one is obvious...

2) After that go ahead and train, but since writing out the dataset config again would be annoying here is when the "Dataset Config.Toml" comes into play. Download it.

And then drag it into your Browser Tabs to view it.

Then simply copy the part, which you will need for the Extras Section in the LoRA trainer.
After all Repeats and Folders didn't change.

Do be careful because the new LoRA will have the same name as your previous LoRA, so make sure to rename it and add V2 or something to it, so you know which one is which.
Another Tip you should know about:
If your Outfit is extremely Asymmetrical or Two-tone in coloring, you can add
"flip_aug = false" after any folder with such outfits.
Ai trains by flipping/mirroring your images, so it's not great for Asymmetrical Outfits.
This disables that, but don't expect some amazing results, Ai still sucks at Asymmetrical stuff, so this doesn't help a lot, trust me on that...

Overall do not be afraid to fail, trust me I've failed a lot and I know you will probably too.
It took me 2 years to get to the point where I have a success rate of 80% or so on any LoRA I make regardless of how many Outfits there are... It takes time, experience and knowledge to get to this point, it's not something you obtain over an evening with a cup of tea.
Alright with that cleared out of our way, I think the time has come for the Advanced Level.
Don't rush it, it's barely used anyways and in most cases you can avoid it by just making several Multi-Outfit LoRAs instead... 100MBs is better than Suffering for a flex and 50MBs, trust me...
Advanced Level
Let me repeat myself again. I do not recommend making any of the Advanced LoRAs.
It's just not worth it. You need incredible Tagging knowledge to actually do it.
Trying to do with after your first Multi-Outfit LoRA is the dumbest decision you can make, but
of course I am not your caretaker and you would probably ignore this warning anyways.
Good luck.
1) Multi-Character LoRA.
If you've looked through the Full Tagging Course, you'll know what Hair Styles, Hair Lengths there are. We'll need them here.
Also Character Tags if possible. Your characters don't have Character tags, because they are not popular enough ? Damn, you are in for a treat...
Anyways same datasets as Multi-Outfit LoRAs just with different characters.
We'll have to tag every Outfit and every Character with different tags...
The Model for this one is a Christmas Pack. It's 24th of December as I'm writing this kek.
It's one of the Outfit Packs I like to make you can find them either on my CivitAi Profile or in my LoRA Collections.
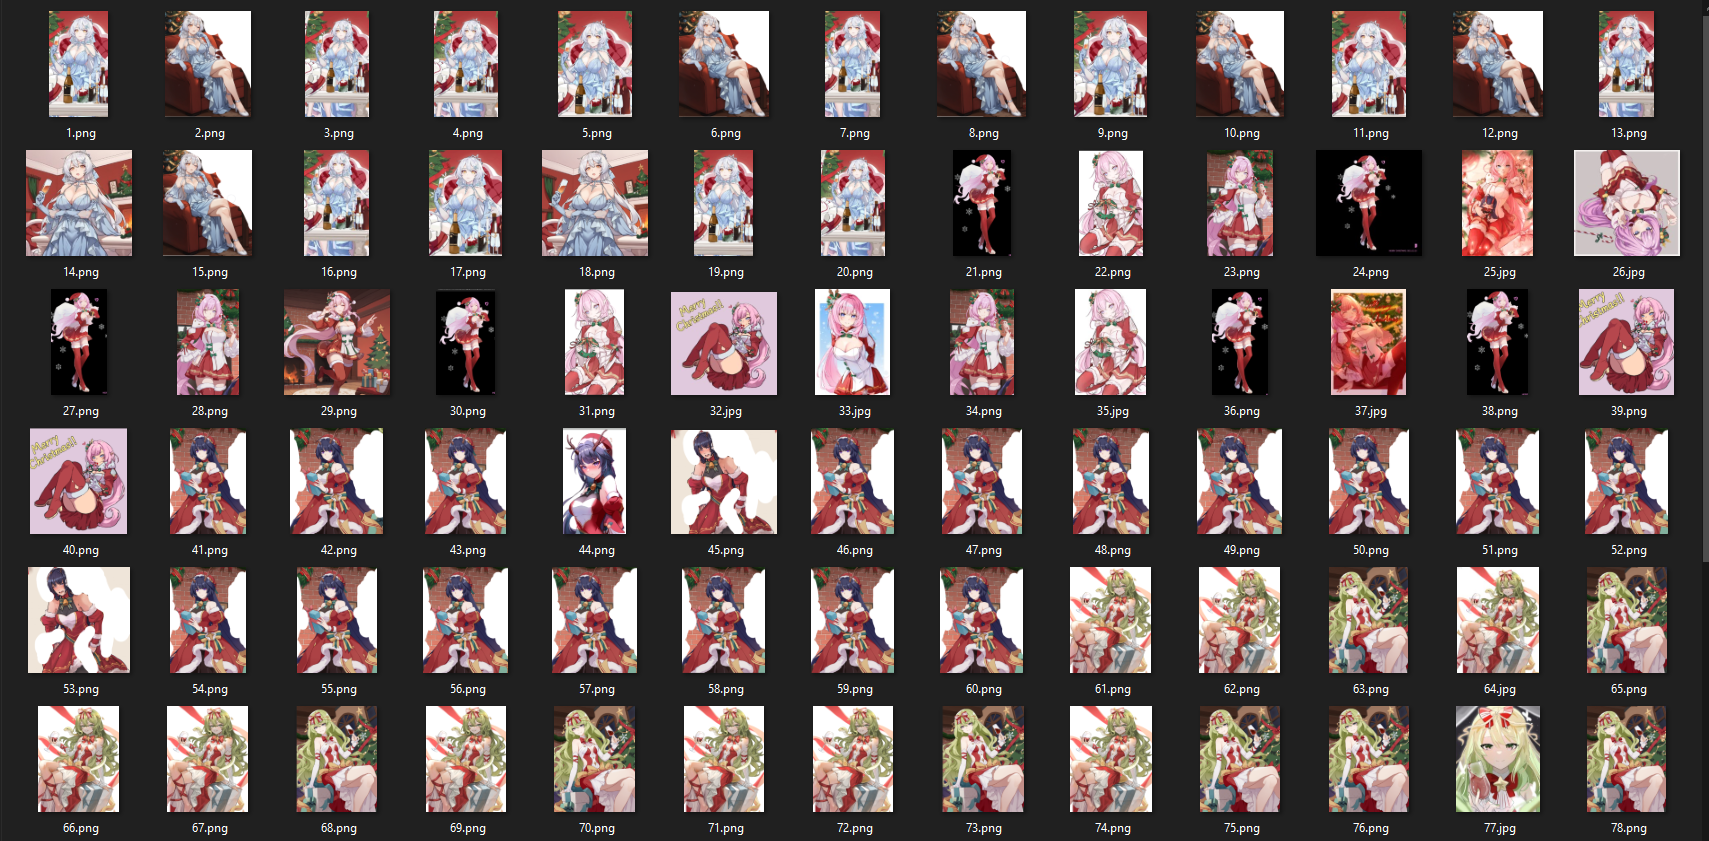

For this LoRA I also had extremely limited amount of images, but I'm used to that to be fair...
To save us both time here are all of the tags, browse through them. Especially the beginning as that's where the character tags are.
ChristmasPack13
1) Xms_HoV, kiana kaslana, kiana kaslana (herrscher of the void), white hair, orange eyes, long hair, hair ornament, tiara, jewelry, dress straps, light blue choker, choker pendant, frills, light blue gemstone, light blue dress, evening gown, detached sleeves, short over long sleeves, see-through sleeves, light blue sleeves, light blue gloves, gloves, long dress, bare shoulders,
2) Xms_Ely, elysia (honkai impact), pink hair, low ponytail, pointy ears, light blue eyes, pink pupils, green bow, hair bow, green bowtie, fur collar, jingle bell, red shrug, wide sleeves, shrug (clothing), strapless shirt, white strapless shirt, cleavage, juliet sleeves, red sleeves, layered sleeves, white frilled sleeves, pleated skirt, red skirt, fur-trimmed boots, thigh boots, red footwear,
3) Xms_Mei, raiden mei, purple hair, purple eyes, very long hair, gradient eyes, antlers, sleeveless bodystocking, see-through cleavage, red collar, collared collar, striped bowtie, teal bow, large bow, two-tone bow, juliet detached sleeves, fur-trimmed sleeves, fur cuffs, red headwear, fur-trimmed headwear, beret, dress bow, red dress, fur-trimmed dress, sleeveless, skirt under dress, black skirt, hoop skirt, shirt under dress, sleeveless shirt, white sleeveless shirt, yellow trim,
4) Xms_Mbs, mobius (honkai impact 3rd), slit pupils, green hair, wavy hair, two-tone eyes, green eyes, white ascot, striped ascot, red bow, striped bow, hair bow, ribbon bow, waist bow, yellow bow, red bowtie, star (symbol), halter shirt, white shirt, layered clothes, center cutout, red leotard, sleeveless leotard, leotard under clothes, white bodysuit, bodysuit under clothes, sleeveless bodysuit, side cutout, white collar, white sleeves, sleeves past wrists, alt detached sleeves, bare shoulders, red strap, arm strap, wrist strap, high-low skirt, two-sided skirt,
ankle lace-up, ankle ribbon,
5) Xms_Sle, red ribbon, hair ribbon, pom pom hair ornament, halter dress, halterneck, snowflake print, snowflake pendant, detached collar, pendant collar, white dress, two-tone dress, layered dress, red striped dress, bare shoulders, puffy detached sleeves, two-tone sleeves, white puffy short sleeves, red puffy sleeves, white braclet, black wrist strap, frilled skirt, striped skirt, striped thighhighs, black thighhighs,
Seele Vollerei, blue eyes, colored inner hair, short hair, black hair, blue hair,
Seele Vollerei, dark persona, alter ego, red eyes, colored inner hair, short hair, black hair, red hair,
6) Xms_Rit, rita rossweisse, pink eyes, hair over one eye, medium hair, neck bell, neck ribbon, maid, enmaided, frilled apron, heart apron, maid apron, frilled apron, cleavage cutout, sleeveless dress, sleeve garter, red sleeveless dress, white apron, white puffy sleeves, alternate detached sleeves, red ribbon, dress ribbon, two-sided fabric, light brown thighhighs, lace-trimmed thighhighs, back bow, white bow, maid headdress, wrist ribbon, white gloves,
7) Xms_Hjk, houraiji kyuushou, side ponytail, dark purple hair, long hair between eyes, colored inner hair, magenta hair, purple streaks, streaked hair, absurdly long hair, mini crown, purple bow, alt hair bow, purple gloves, half gloves, short dress, fur trim, strapless dress, purple dress, magenta trim, off-shoulder cape, red cape, fur-trimmed cape, bare shoulders, purple choker, red striped bow, purple thigh boots, purple footwear, dress ribbon, long ribbon, bell bow, fur boa,
I mean that's pretty much it. No Character tags are intervened, except with Seele where we have 2 variations basically, which I manually added later.
Everything else from here is the same as Multi-Outfit LoRA, but you have to remove every Hair/Character related tag after AI Auto-tagging.
Here are the final results, don't worry about Mobius's skirt I fixed it with some extra tagging.
But overall since the material is very limited, it's not a perfect LoRA in any way.
Not my fault at this point and I don't want to generate images and then re-train with new
images, it takes too long and it's not fun.

2) 10+ Outfits LoRA.
Alright so I would assume your first question is Why and 2nd is How ?
Well there are 2 Why-s.
1) First is obvious, Character got more than 10 Outfits and I don't want to make multiple LoRAs.
2) F-k it, we ball. No like seriously. It's fun if you like tagging, experimenting and pushing the limits of Ai LoRA training. That's kind of why my entire CivitAi profile exists...
As for How, that's a different question...
Let's go over our Model first. It's going to be Fuchsia from Strinova.
She has 15 Outfits. (Technically 16, but Gingerbread Outfit hasn't been uploaded onto the Wiki and I can't find it online...)
Anyways 15 is better as I can explain the How.
In order to Make 10+ Outfit LoRAs we will have to Group our Outfit Folders.
The grouping is done with a maximum of 4 different Outfits.
So let's make an example:
You have 15 Outfits ? What's the closest number divided by 4 ? Okay it's 12.
So we will have 4 Groups: 4 + 4 + 4 + 3
More Examples:
You have 13 Outfits ?
Again 12, so 4 + 4 + 4 + 1 or to avoid 1 go for 4 + 3 + 3 + 3,
(It is recommended to avoid a group with a single outfit, except when you want it to have
the most detailing of all outfits.)
You have 18 Outfits ?
Now 16, so 4 + 4 + 4 + 4 + 2 or again 4 + 4 + 4 + 3 + 3, but 2 overall is okay to keep.
Images per Outfit will also follow different Rules.
Each Group must have 60 Images. (Except if it's a group with a single image, then it's 30 Images)
Here is the table:
Group of 4 Outfits => 15 Images Per Outfit
Group of 3 Outfits => 20 Images Per Outfit
Group of 2 Outfits => 30 Images Per Outfit
Group of 1 Outfit => 30 Images Per Outfit, but X2 amount of repeats.
Tagging knowledge is tested here to it's full potential... If anything it's brutal here...
Every single Outfit has to be tagged differently... When there are 15 of them, a lot of them are just bound to be similar with each other...
Make sure to remove like 90% of tags after Ai Auto-tagging, nothing has to sleep through...
Anyways back to our Model.
There are 15 Outfits and the Groups I went with are 3 + 4 + 4 + 4
So the 1st Group has 20 images per Outfit, and other Groups have 15 images per Outfit.
This image shows 1st Group and 2nd Group.

And this image shows 3rd Group and 4th Group.

Now let's tag all of the outfits. Don't be surprised, but yes it's extremely damn long...
Skip this part if you are not interested in reading these tags.
Fuchsia
1) Fch_Def, pink hair, short hair, pink eyes, black unitard, unitard, partially unzipped, chest sarashi, bandages, bandaged thigh, chain, black choker, black hairband, grey cloak, cloak, hooded cloak, straps, loose belt, black belt, grey sleeves, third-quarter sleeves, elbow gloves, metal cuffs, fingerless gloves,
black sneakers,
2) Fch_Lgd, pink hair, short hair, pink eyes, dark blue bodysuit, gradient bodysuit, thigh boots, white footwear, ice skates, silver trim, skeletal tail, fishbowl helmet, see-through, bone necklace, light blue shirt, underbust, halter shirt, clothing cutout, hexagon print, white shrug, shrug (clothing), juliet sleeves, white sleeves, white bracelet, sleeve garter, white gloves, gloved sleeves,
3) Fch_Amz, blonde hair, medium hair, small ponytail, red eyes, single-shoulder shirt, brown crop top, green bra, bra peek, single sleeve, fringe trim, goggles, goggles around neck, leaf, leaf hair ornament, single bare shoulder, short cape, brown shirt, brown cape, rope belt, midriff, side cape, cross-laced sleeves, navel, wrist strap, green armband, single detached sleeve, brown sleeves, asymmetrical sleeves, white headwear, hat, short shorts, black shorts, green skirt, half-skirt, yellow flower, horned hat, bandaged thigh, bandaged hand, single fingerless glove, detached leggings, black leggings,
stirrup legwear, green colored shoe sole, sandals,
4) Fch_Pjm, pink hair, medium hair, pink eyes, camisole, white camisole, shoulder strap, o-ring choker, o-ring, black choker, pink ribbon, denim shorts, short shorts, chest strap, blue shorts, blue bracelet, fish hair ornament, bandaid on nose, shark hat, blue headwear,
cross-laced sandals, two-tone sandals, white sandals, blue sandals, silver anklet,
5) Fch_CN, light pink hair, black streaks, streaked hair, pink eyes, chinese clothes, sleeveless shirt, red crop top, bare shoulders, chinese knot, mandarin collar, midriff, arm ribbon, black ribbon, black undershirt, multiple belts, black belts, cross-laced armwear, arm strap, uneven gloves, black fingerless gloves, thumb ring, sunglasses, eyewear on head, asymmetrical armwear, orange-tinted eyewear, bead necklace, grey pants, bell-bottoms, coin, coin on string, red tassel,
gold anklet, black flats, flats,
6) Fch_Maid, pink hair, red eyes, short twintails, short hair, maid, enmaided, white apron, black blouse, blouse, double-breasted, cleavage cutout, armpit cutout, puffy short sleeves, white sleeve cuffs, white wristband, alt fingerless gloves, alt black gloves, black ribbon, hair ribbon, puffy shorts, black puffy shorts, grey thighhighs, gradient thighhighs, thigh holster, white collar, collared collar, black hairclip, maid headdress, frills, back bow, white bow, yellow bowtie,
high heel boots, black boots,
7) Fch_Brt, pink hair, medium hair, pink eyes, low ponytail, parallel hairclips, single earring, dress shirt, white dress shirt, two-tone vest, black vest, buttons, maroon vest, miniskirt, black skirt, sleeves rolled up, bandaged elbow, gold trim, alt black gloves, partially fingerless gloves, gold chain, chain belt, multiple thigh straps, thigh belt, cocktail shaker, neck ribbon, red ribbon, shoulder belt,
ankle garter, ankle strap, belt boots, black belt boots, gold colored shoe sole, brown socks,
8) Fch_Sch, light pink hair, short hair, orange eyes, school uniform, serafuku, pink neckerchief, black sailor collar, dark blue shirt, midriff, dark blue skirt, pleated skirt, unzipped, white belt, multiple belts, buckle, letterman jacket, white jacket, sleeves past elbows, mismatched gloves, alternate fingerless gloves, wristwatch, gradient eyewear, purple-tinted eyewear, goggles on head, visor, legwear garter, thigh strap,
leg warmers, dark blue legwear warmers, ankle belt, cross-laced footwear, black shoes, cyan colored shoe sole,
9) Fch_Swm, light orange hair, short hair, pink eyes, dark blue one-piece swimsuit, competition swimsuit, pendant choker, shell pendant, silver thighlet, swimsuit, see-through jacket, gradient jacket, open jacket, see-through sleeves, fish tail, long sleeves, blue gemstone, covered navel, blue ribbon, shell hair ornament, star hair ornament, ahoge, x hair ornament, black bracelet,
platform sandals, black socks, stirrup footwear, black ribbon, ankle ribbon,
10) Fch_Mgc, pink hair, short twintails, short hair, blue eyes, multiple hairclips, head wings, large bow, orange bowtie, yellow leotard, leotard, white gorget, gorget, side cutout, detached sleeves, yellow sleeves, brooch, red gemstone, showgirl skirt, orange skirt, black trim, orange ribbon, gradient clothes, white wrist cuffs, black gloves, gloves, thigh strap, multiple thigh straps, white thighhighs, thighhighs,
cross-laced boots, yellow footwear, winged footwear,
11) Fch_Wnt, pink hair, pink eyes, short hair, bandaid on nose, bandaged cheek, black pleated skirt, high-waist skirt, cross-laced shirt, white shirt, spaghetti strap, light blue scarf, long scarf, two-sided jacket, unzipped, white hooded jacket, light blue ribbon, hair ribbon, shark hair ornament, hooded jacket, winter clothes, shorts under skirt, bike shorts, black bike shorts, white puffy sleeves, puffy sleeves, ribbed arm warmers, white arm warmers, white gloves, orange thighhighs,
light blue footwear, black colored shoe sole, two-tone sneakers,
12) Fch_Hlw, white hair, short hair, purple eyes, coattails, tailcoat, two-sided coat, torn shirt, grey shirt, detached collar, collared collar, black collar, halloween costume, black headband, purple trim, halterneck, silver thorns, open coat, suspenders, torn shorts, black torn shorts, black belt, belt buckle, black sleeves, sleeves past elbows, black sleeve cuffs, fingernail gloves, alt black gloves, black thigh strap, bandaged legs,
ankle tattoo, bandaged ankle, black ankle boots, grey colored shoe sole,
13) Fch_Hrm, light brown hair, short hair, red eyes, sleeveless turtleneck, sleeveless leotard, grey leotard, grey stole, leotard under clothes, grey corset, belt pouch, black shorts, bike shorts, metal thigh strap, snap-fit buckle, two-side fabric, white coat, open clothes, high collar, wide sleeves, white wide sleeves, black arm warmers, half gloves, black half gloves, black wrist strap, cutout above navel, grey hairband,
black footwear, ankle boots,
14) Fch_Prc, blonde hair, orange eyes, symbol-shaped pupils, small ponytail, black bowtie, jewelry, uniform, mini crown, crown, collared shirt, white collared shirt, white ascot, frilled ascot, black vest, vest, navel cutout, white pants, dress pants, cropped jacket, red jacket, feather, red sleeves, white sleeve cuffs, frilled sleeves, white gloves, gloves, epaulettes, gold buckle, brown belt, white rope, sheathed, two-sided cape, red cape, fringe trim,
brown footwear, knee boots, red colored shoe sole,
15) Fch_Tct, light pink hair, aqua eyes, tactical clothes, camouflage pants, grey pants, camouflage, cropped shirt, grey bodystocking, bodystocking, torn bodystocking, covered navel, harness, metal buckle, light blue trim, black belts, grey thigh strap, thigh pouch, short over long sleeves, camouflage sleeves, fingerless gloves, black gloves, chest pouch, pouch, black headwear, tactical helmet, assault visor,
shin guards, black shin guards, cross-laced footwear, black boots, light blue colored shoe sole,
Got all of that ? Good. The rest of this is the same as Multi-Outfit LoRA.
Create a Folder
Upload the Dataset
Ai Autotag it
Remove almost all of the tags
Sort them into folders (15 in this case)
Tag each Outfit (Yes, this can take up to an hour of tagging/checking stuff...)
Okay now that our Outfits are tagged, Terminate the Dataset Maker as we need to sort them by groups as we obviously can't train with 15 different folders, Ai would take more than 5 hours to do that...
To group the outfit folders, we'll need to move images + .txt files from folders to leader folders.
In this case 1st 4th 8th and 12th Folders will act as the leaders of the groups.
1st Folder will receive: 2nd and 3rd Folders.
4th Folder will receive: 5th, 6th and 7th Folders.
8th Folder will receive: 9th, 10th and 11th Folders.
12th Folder will receive: 13th, 14th and 15th Folders.

And as for how to move our images from folder to folders, it's rather simple
Go to the folder you want to move images + .txt files from.
Select your images (All 15 or All 20 basically)
Click on the icon at the top, which looks like a "Folder with an Arrow"
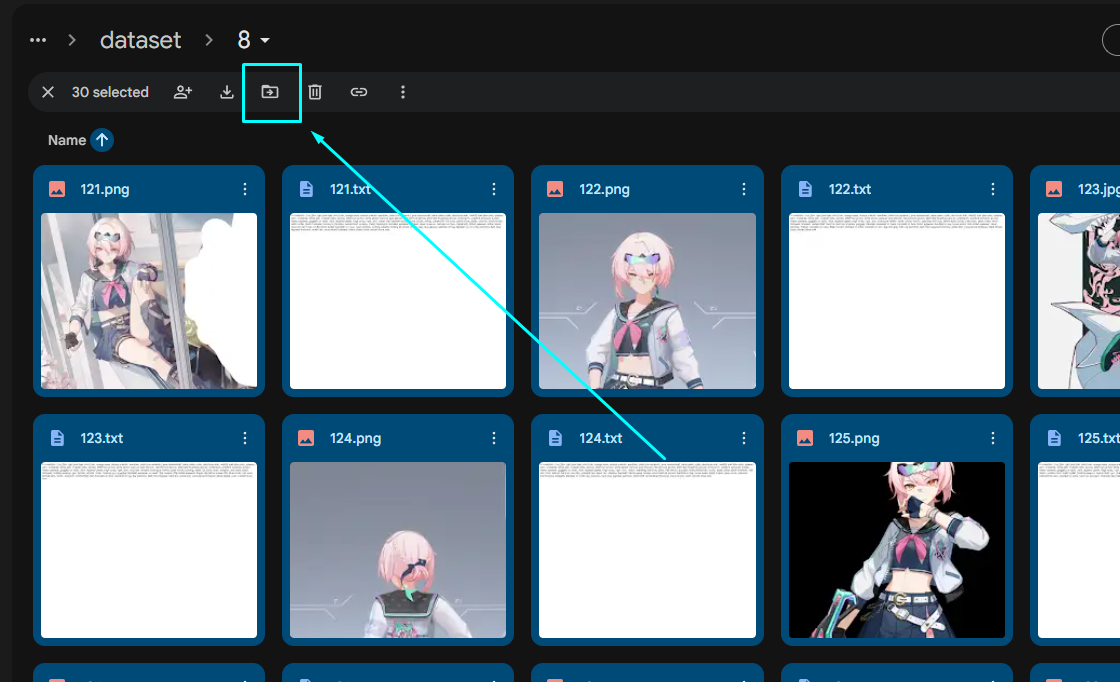
Click on the Arrow next to "Dataset"

Find the Folder you want to move your images + .txt files to and click on one of the Move buttons.

Repeat this Process for every Folder until you are left with just 4 Folders (or more if you have even more Outfits.)

Now let's head to the LoRA Trainer.
Project Name + Activation Tags at 2 as per usual.
In the Extras we'll do the same thing too, except it will look like this.
So here is some Math for you.
8 Outfits => (20 Images x 10 Repeats) x 8 Folders = 200 Steps x 8 = 1600 Steps in total.
This will take roughly 3 hours to train. So we can try to aim for that.
15 Outfits => (60 Images x 6 Repeats) x 4 Folders = 360 Steps x 4 = 1440 Steps in total.
Overall 6 repeats is plenty to properly train Folders with multiple Outfits in them.
Ai might still struggle, but whatever.
Of course in a situation where you have a single Outfit in one of the groups, it would look like this
Example with 13 Outfits so Groups are 4 + 4 + 4 + 1.
(60 image x 6 Repeats) x 3 + (30 Images x 12 Repeats) x 1 Folders = 1440 Steps in total.
Example with 18 Outfits so Groups are 4 + 4 + 4 + 4 + 2.
(60 Images x 6 Repeats) x 5 = 1800 Steps in total.
This is getting quite close to the time limit of course.
How do we go past that ? Increase the Group Sizes, but keep the amount of images to 60, yep you've heard it right... Even less images for each Group's outfits, 12 to be exact.
With 20 Outfits the groups should be: 5 + 5 + 5 + 5
So 12 Images per Outfit, still 60 images per Group.
(60 Images x 6 Repeats) x 4 = 1440 Steps in Total.
As you can see we are back to the same amount of steps as we had with 15 Outfits, but we are now at 20. Pretty cool huh.
Wanna go further ? 28 Outfits groups are gonna be: 6 + 6 + 6 + 6 + 4
So 10 Images per Outfit AND still 60 images per Group.
(60 images x 6 Repeats) x 5 = 1800 Steps In Total.
This is so absurd I feel like I'm writing like a mad man...
I didn't even cover this in the Guide Video...
I've never even went past 28 Outfits myself... And when I did 28, I didn't have any of this information, it didn't even work properly... Now theoretically would this math work ? In theory Yes, but can you imagine the Tagging ? It's going to be pure HELL to make it work...
But this of course can be taken even further,
but what kind of f-ing character has so many outfits to begin with ???!!
Regardless that's pretty much it... Just train it, stop at 3rd Epoch and you are good to go.
Here are the final results for this LoRA:

Oh no Christmas LoRA Image Spoiler! Kek.
The Finish Line.
Well I do believe Congratulations are in order... You've made it somehow.
Hopefully in one piece and you didn't overload your brain with Information...
Once again let me remind you to take it slowly, don't rush this, you won't be able to learn all of
this in one go. It will take months to get good at tagging just from your head alone.
Don't expect to go through this guide and instantly become Good. That's not how that works.
Anyways here are the Datasets used for this Guide, check them out if you'd like:
(Not including Intermediate Level's 7th Section Datasets as I don't see the point.)
Songque's LoRA:
https://drive.google.com/drive/folders/1_Of9tbCL-br4GUPKwREFwqOJunKrAYXi?usp=drive_link
Cecilia's LoRA:
https://drive.google.com/drive/folders/17b1tJ_JaU8Ct6XGHJ6nZQZDhrAP6Klkh?usp=sharing
Christmas Pack LoRA:
https://drive.google.com/drive/folders/1nDHH1U-7_s1P4aun88JQ1EOnfQsUQyrx?usp=sharing
Fuschia's LoRA:
https://drive.google.com/drive/folders/1N79vuDKAARgnaI1gdu1kjAV2q1kMbUsw?usp=sharing
And since this Guide is technically a Christmas Gift to everyone from me...
I wish everyone a Merry Christmas and a Happy New Year. Let all of your future LoRAs be successful on your first tries. See you around in the next Year!